# Flexq8
# Dashboard
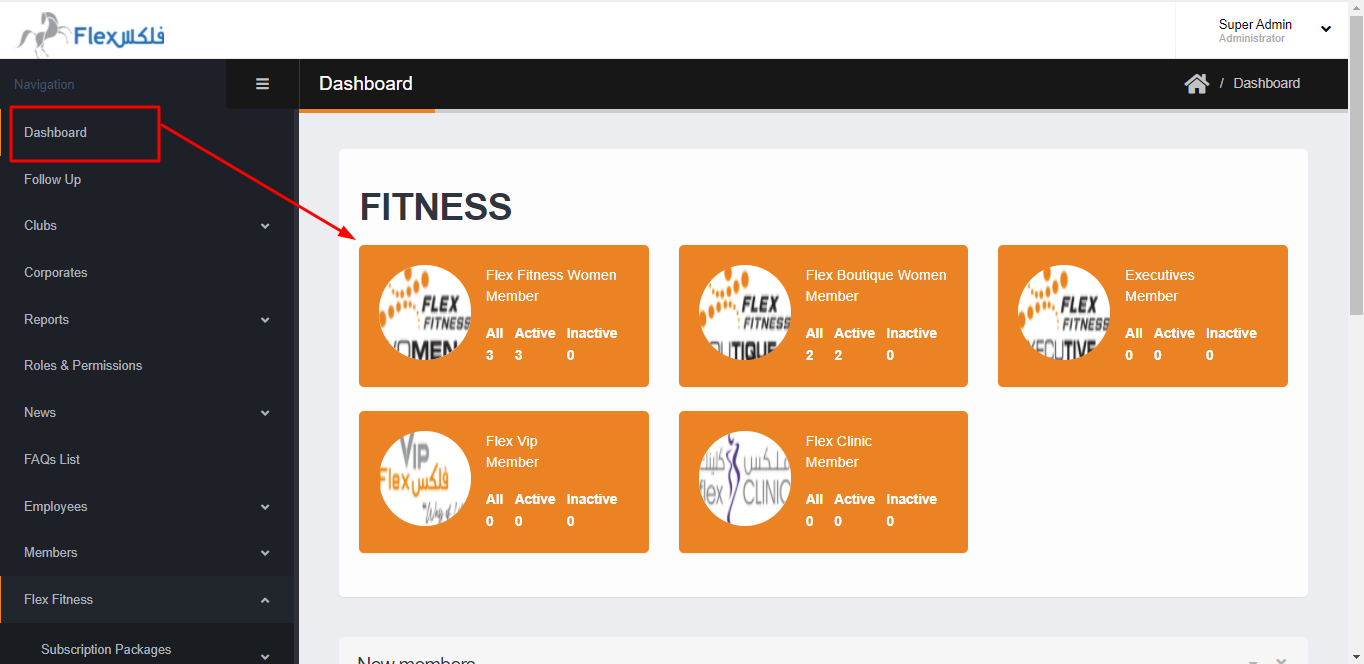
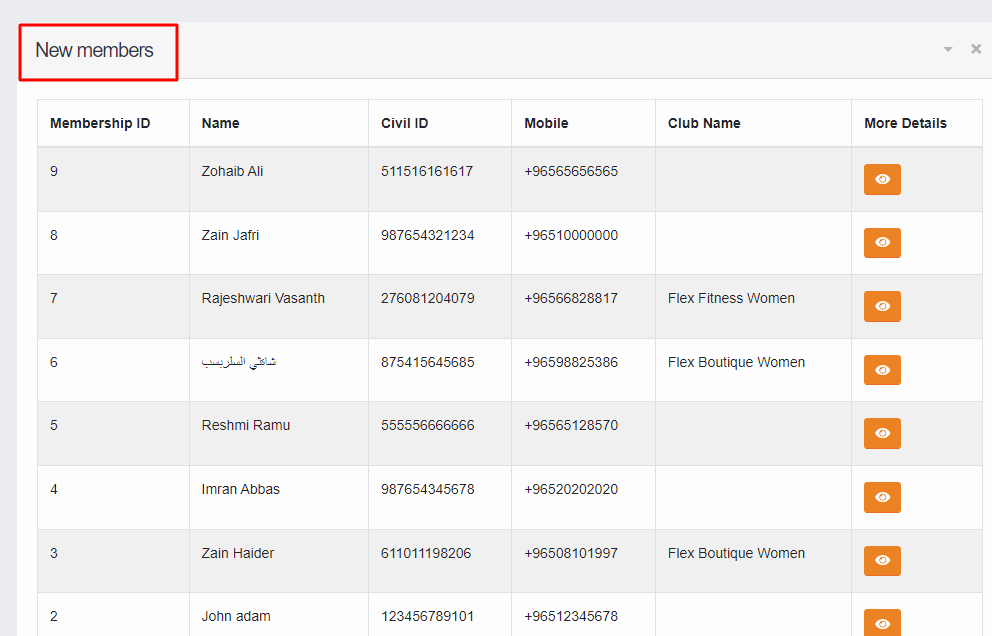
In the dashboard section, Admin user and staff members can see all clubs with their All subscriber of the club, Active & inactive members of each club. Also, the admin & staff members can see the newly registered member in this section.
# Dashboard
In the dashboard section, Admin user and staff members can see all clubs with their All subscriber of the club, **Active & inactive** members of each club. Also, the admin & staff members can see the newly registered member in this section.
[](https://flex.doc.exodevs.com/uploads/images/gallery/2022-05/dashboard.png)
[](https://flex.doc.exodevs.com/uploads/images/gallery/2022-05/dashboard-new-member.png)
# Follow-Up
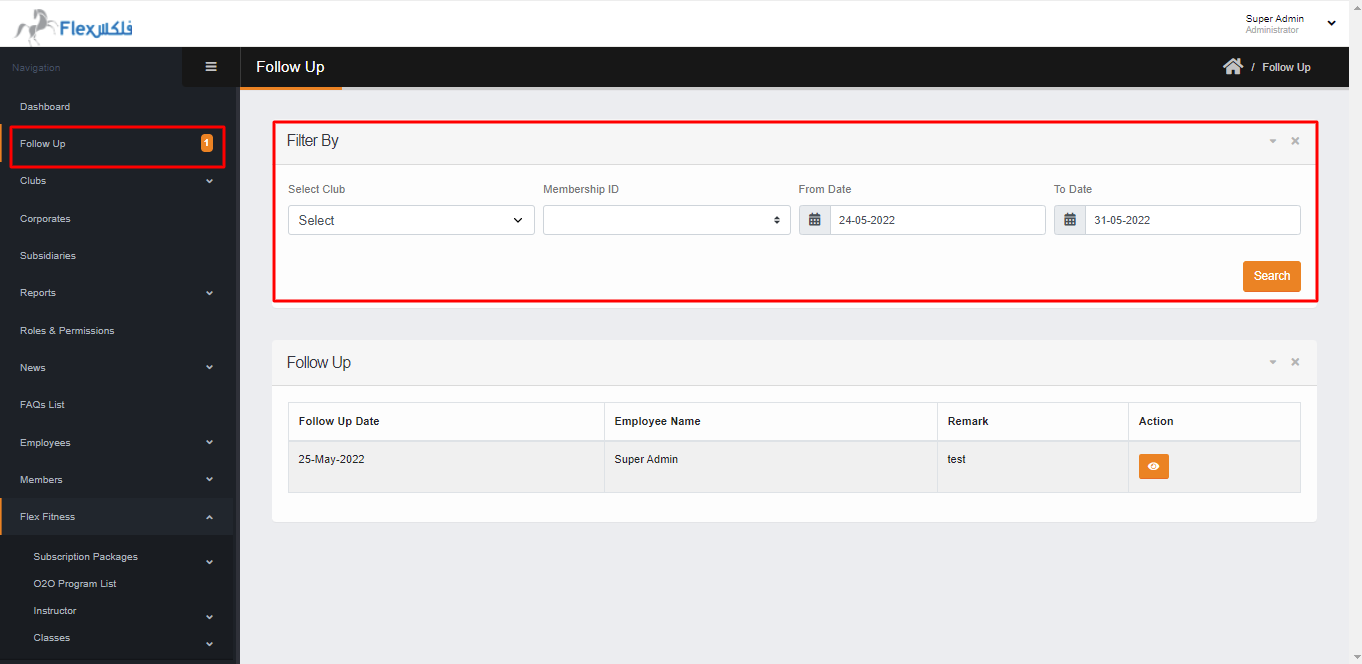
In this section, You can check the follow-up details for the member. here you can search the follow-up by selecting the **club**, search by **Membership Id**, and search the follow up between the **FROM – TO** date.
[](https://flex.doc.exodevs.com/uploads/images/gallery/2022-05/3c7follow-up-filter.png)[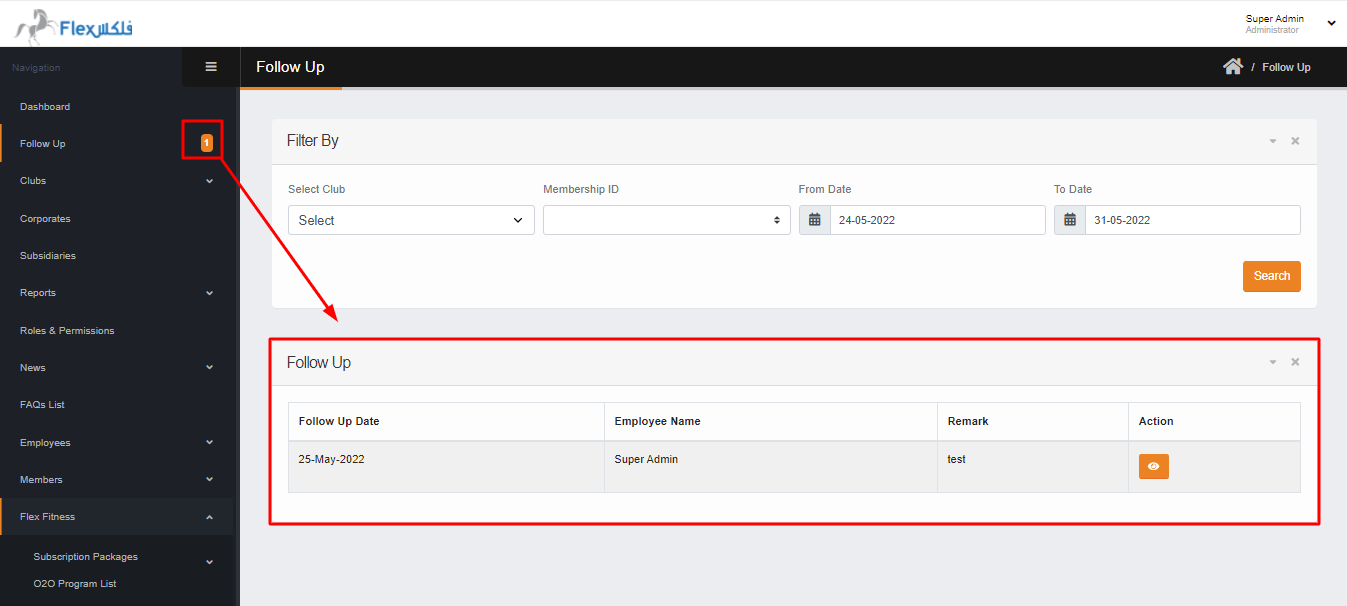](https://flex.doc.exodevs.com/uploads/images/gallery/2022-05/u0pfollow-up-detail.png)
# Add New Club
In the section, you can add the new club by clicking on the **club list**. Here you can add the new club, and on the right side, you can edit the existing club. For a better result, you can add the Club Icon of **885 x 1900 size**, club Logo **382 x 120 size** & club background Banner image **2500 x 1667 size**, Also you can add the images and videos up to **5MB** & **20MB** respectively against the club by clicking on manage gallery in the **action field** .
[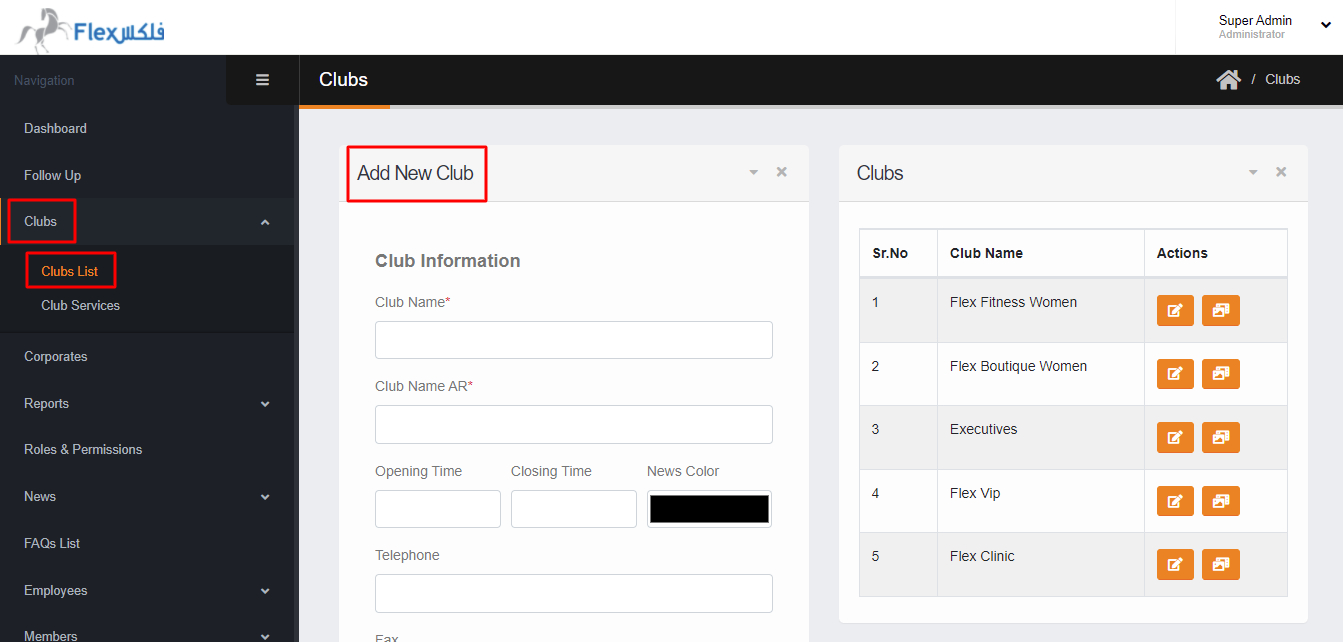](https://flex.doc.exodevs.com/uploads/images/gallery/2022-05/club-list.png)
[](https://flex.doc.exodevs.com/uploads/images/gallery/2022-05/edit-club.png)[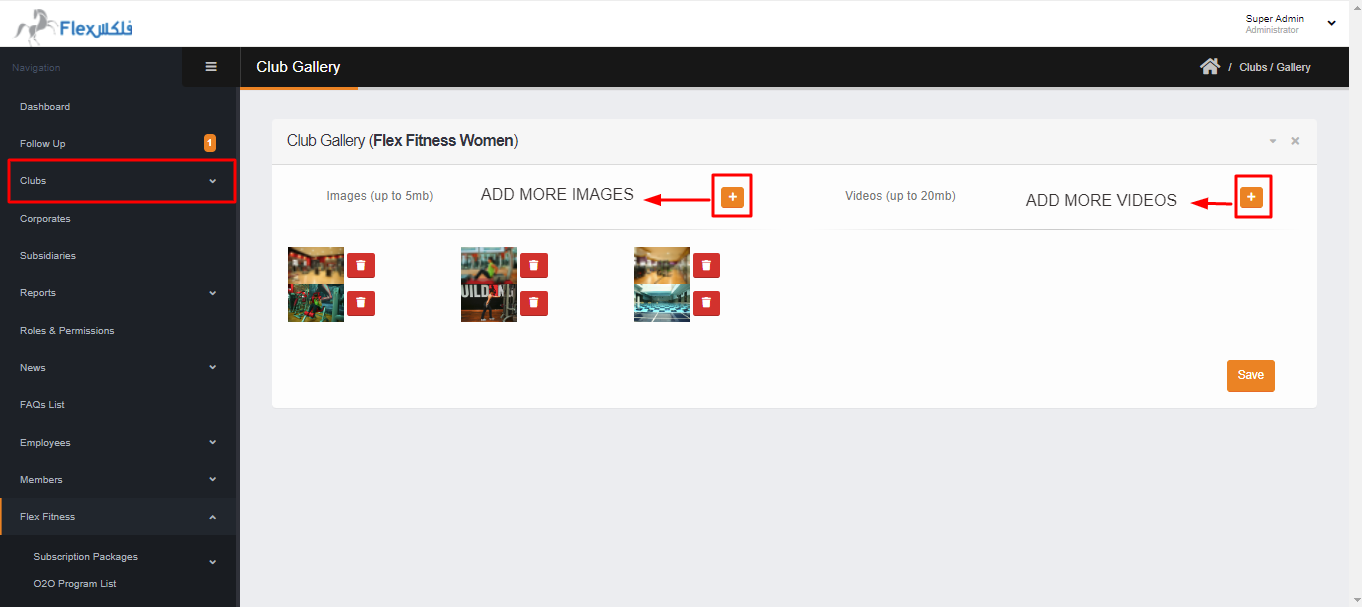](https://flex.doc.exodevs.com/uploads/images/gallery/2022-05/add-image-video.png)
# Club Services
In this section, you can add the club services. On the right side of the club service page, there is an option **ADD SERVICE.** When you click on the **ADD SERVICE** you have to select the **CLUB SERVICE NAME IN ENG** & **ARABIC** & **SERVICE ICON**. Here you can also delete the service and edit the service by clicking on **delete** & **edit** respectively, from the club service list
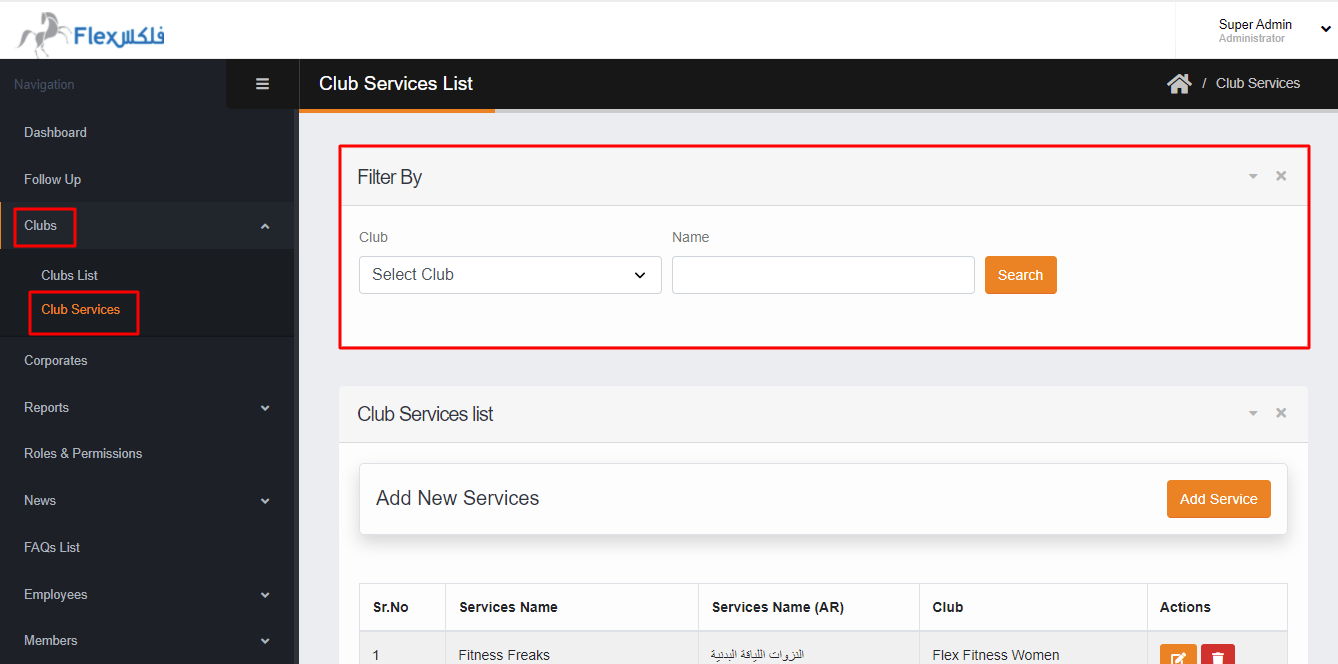
You can search the services against the **club** & by **service name** in English only from the filter.
[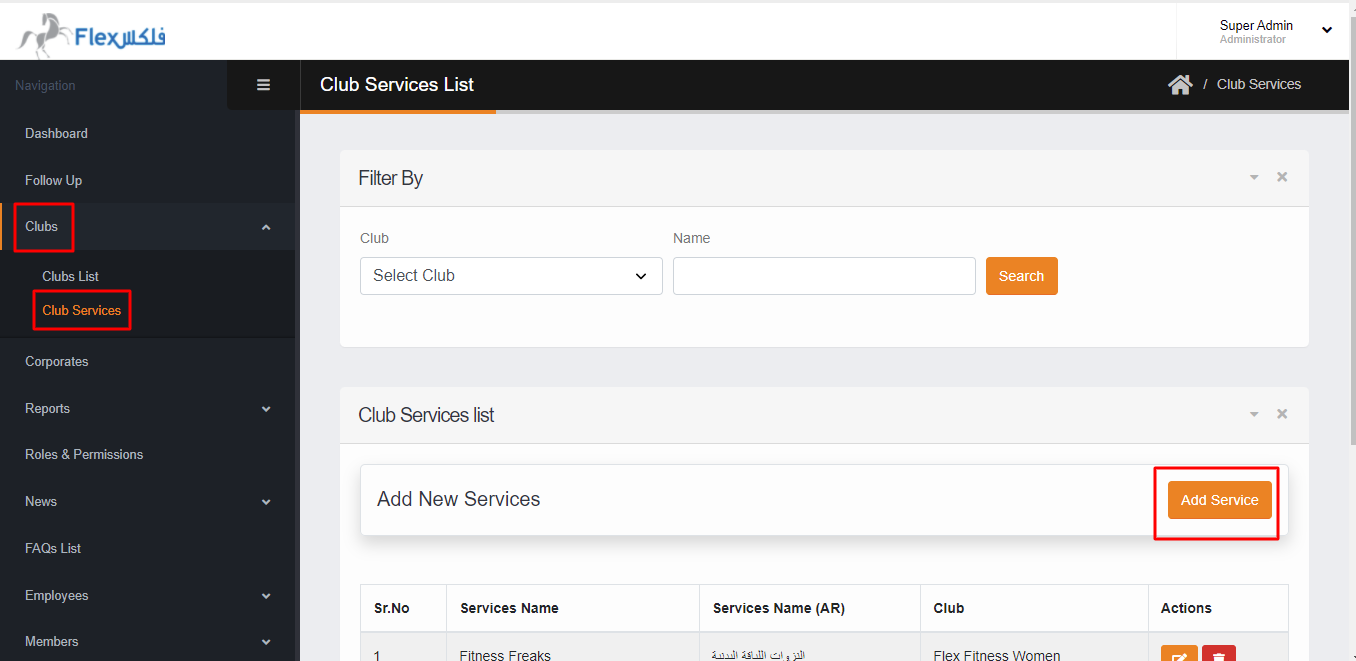](https://flex.doc.exodevs.com/uploads/images/gallery/2022-05/club-service.png)
[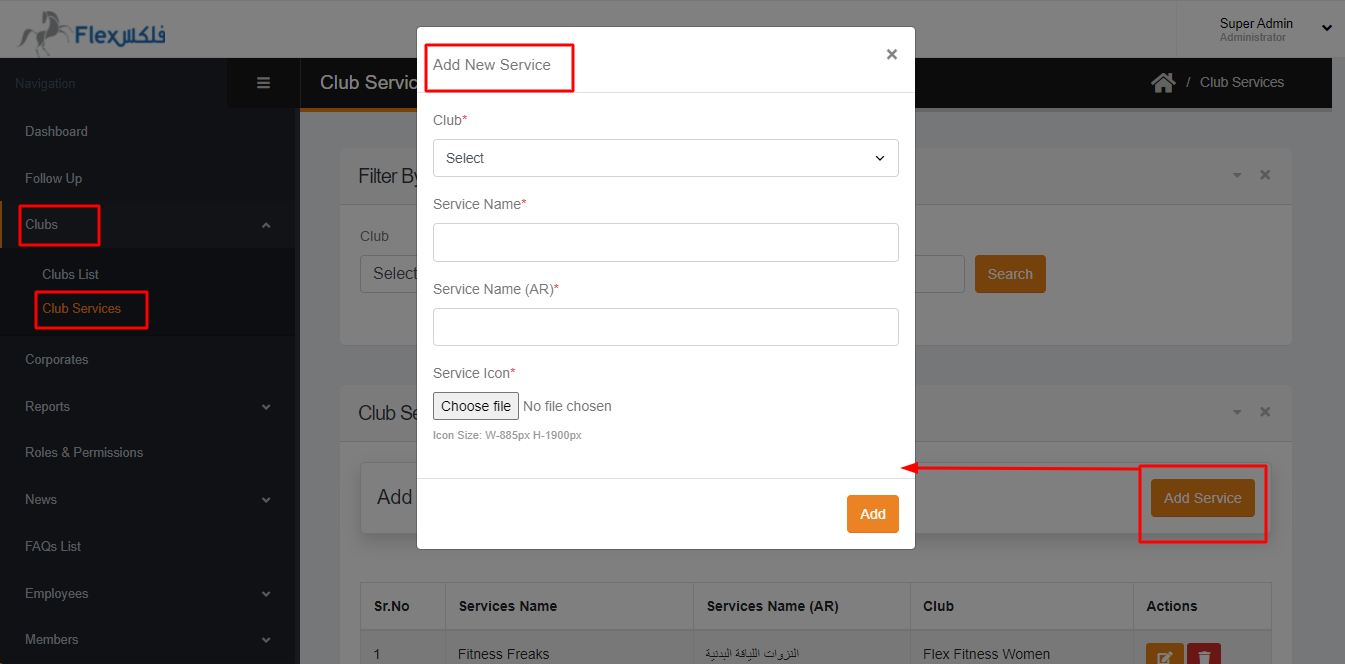](https://flex.doc.exodevs.com/uploads/images/gallery/2022-05/add-club-service.png)
[](https://flex.doc.exodevs.com/uploads/images/gallery/2022-05/club-service-filter.png)
# Corporate
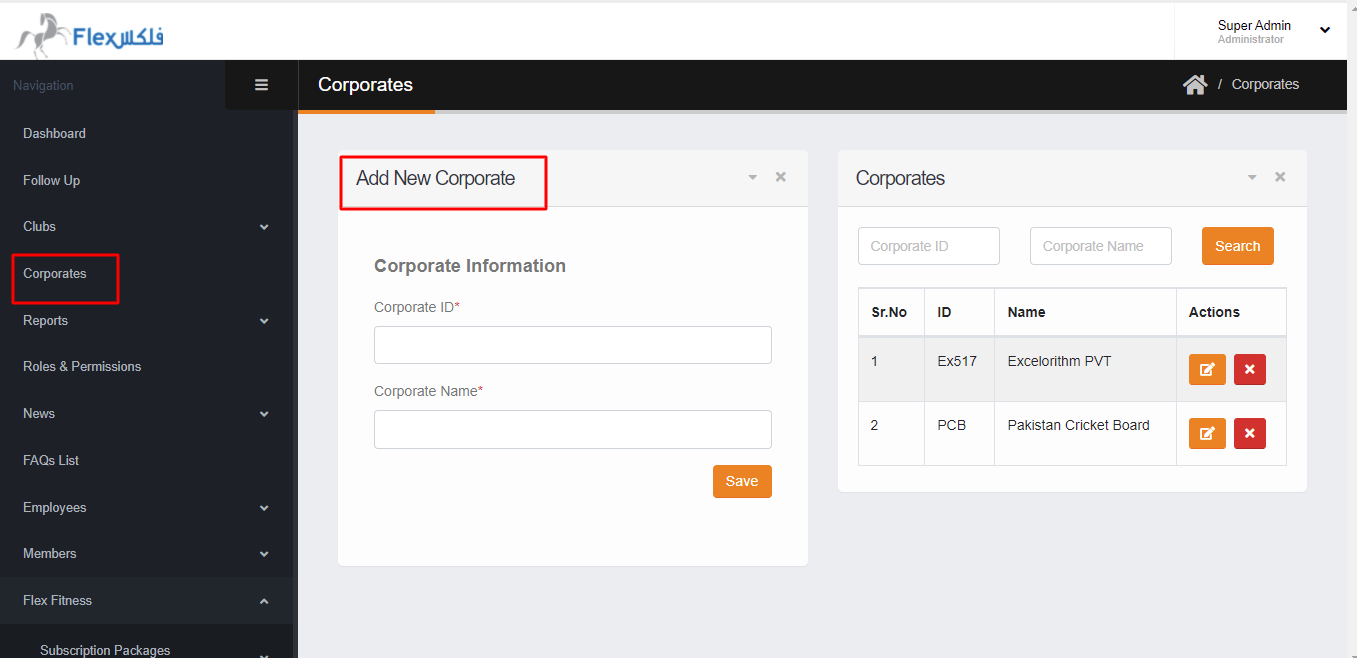
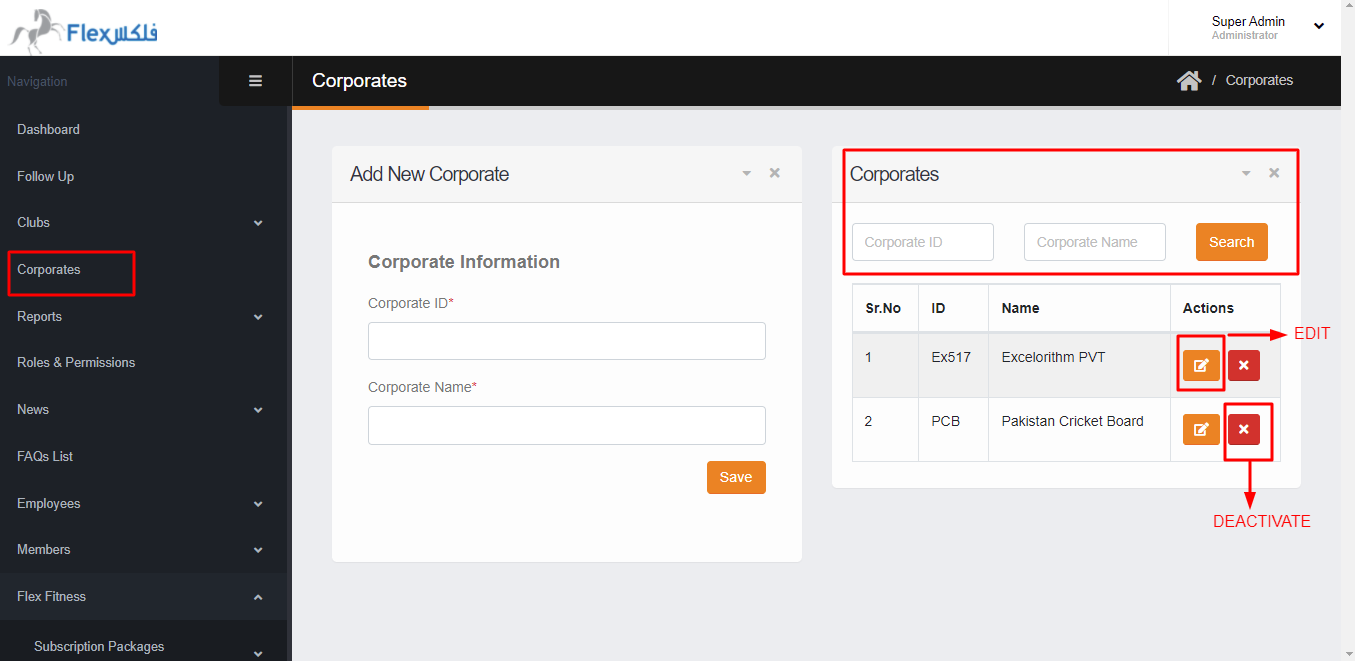
In this section, you can **ADD** the corporate by **Corporate ID** and **Corporate Name** for the company registration. Also, you can search the existing corporate by his **ID** & **Name** from the search filter. You can **edit** & **deactivate** the corporate from the corporate list on the right side.
**Note:** When the corporate is deactivated it will not deleted from the corporate list.
[](https://flex.doc.exodevs.com/uploads/images/gallery/2022-05/add-corporate.png)
[](https://flex.doc.exodevs.com/uploads/images/gallery/2022-05/corporate-list.png)
# Subsidiary
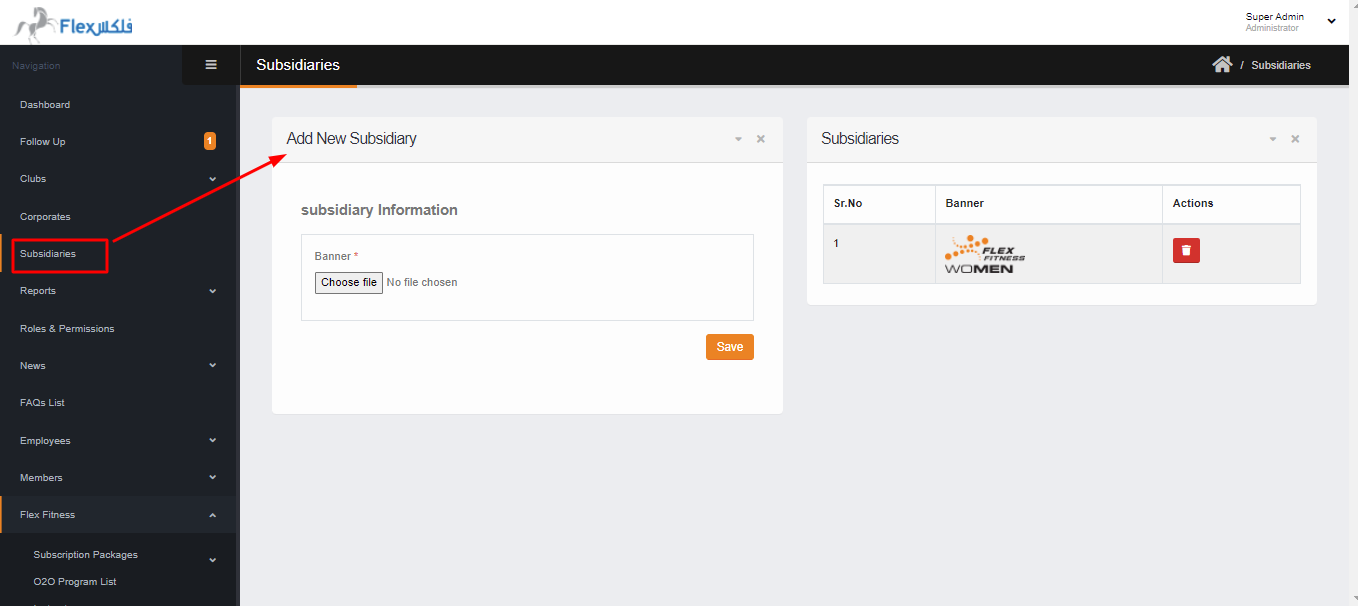
In this section, you can add the **Subsidiary images. For the better result on front-end you can add the **Subsidiary image** up to **382 x 120 image size.
Also, you can delete the **Subsidiary** by clicking on delete button in the action column.
[](https://flex.doc.exodevs.com/uploads/images/gallery/2022-05/add-subsidiary.png)[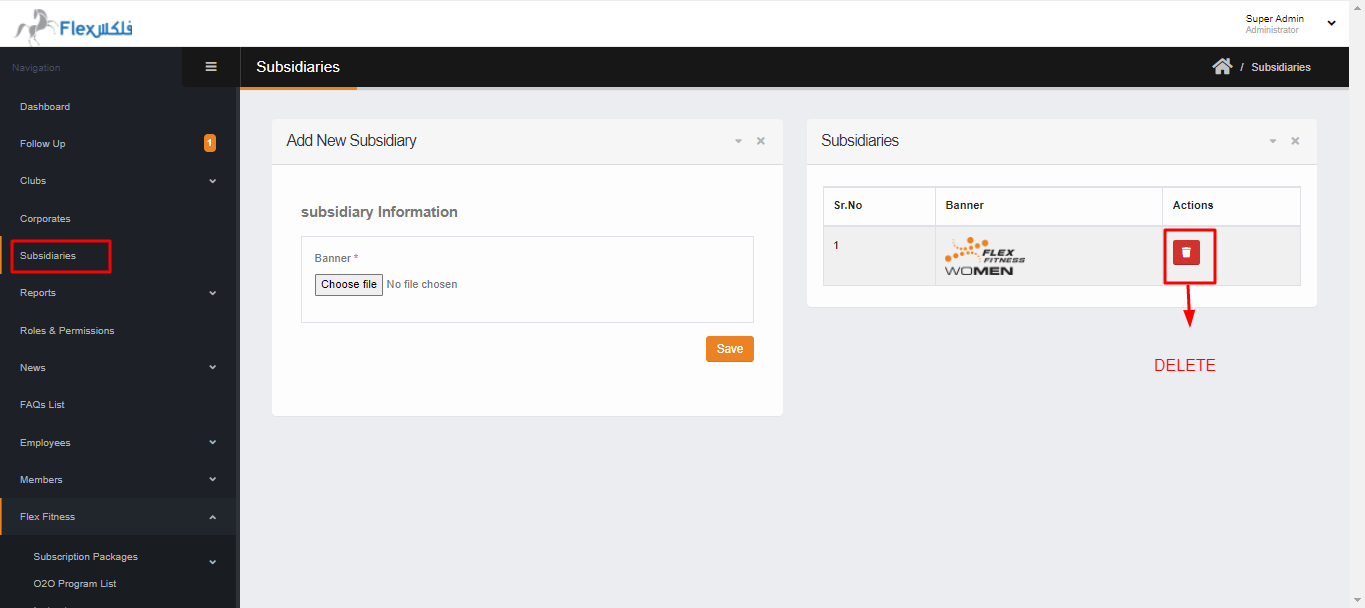](https://flex.doc.exodevs.com/uploads/images/gallery/2022-05/delete-subsidiary.png)
# Reports
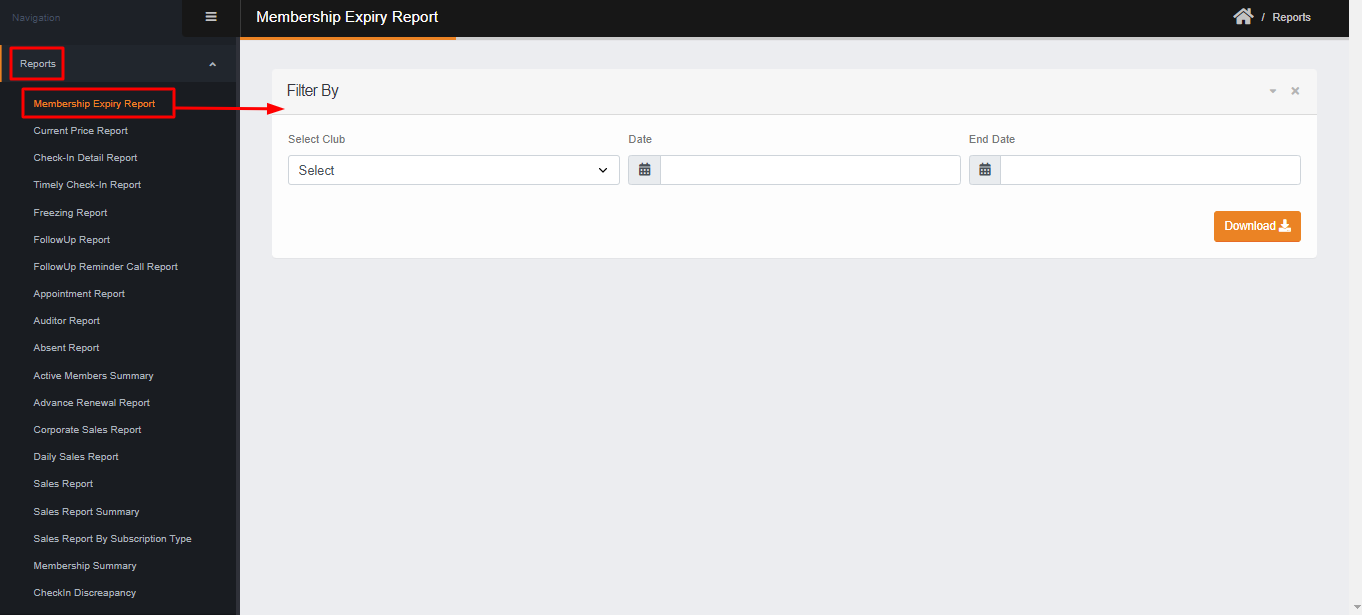
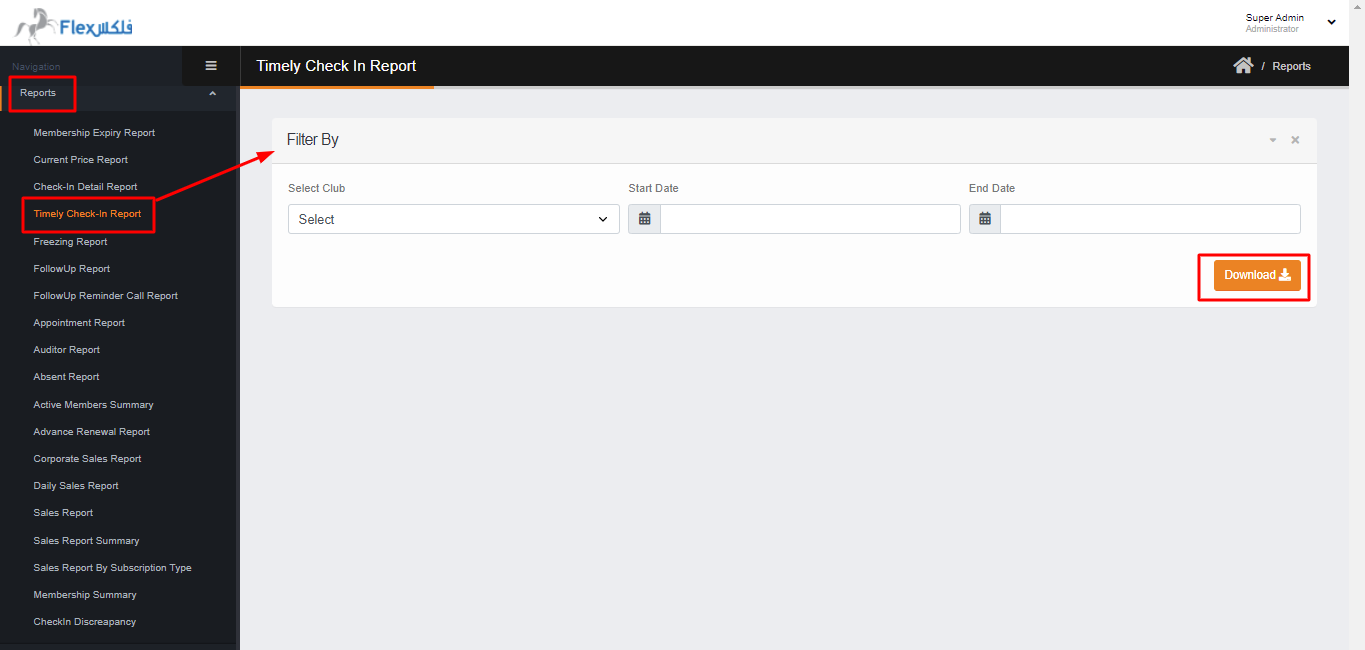
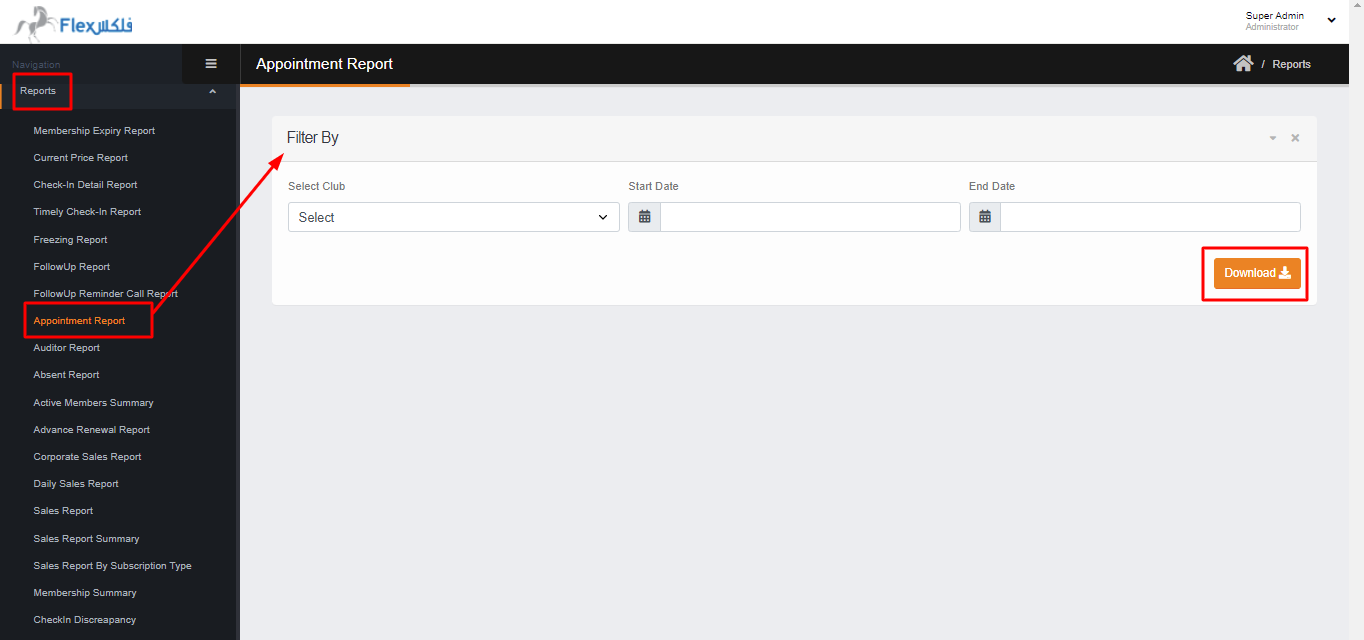
This section contains the many **Reports,** in this section you can check the record. Most of the Reports have a different filter criteria.
The following are the reports that admin can download. The file will download in Excel format.
- Membership Expiry Report
- Current price Report
- Check-in detail Report
- Timely Check-in Report
- Freezing Report
- Follow-up Report
- Follow-up Reminder Call Report
- Appointment Report
- Auditor Report
- Absent Report
- Active Members Summary Report
- Advance Renewal Report
- Corporate Sales Report
- Daily Sales Report
- Sales Report
- Sales Report
- Sales report Summary
- Sales Report by Subscription Type
- Membership Summary
- Check-in Discrepancy Report
[](https://flex.doc.exodevs.com/uploads/images/gallery/2022-05/expiry-report.png)
[](https://flex.doc.exodevs.com/uploads/images/gallery/2022-05/current-price-report.png)
[](https://flex.doc.exodevs.com/uploads/images/gallery/2022-05/timely-chech-in.png)[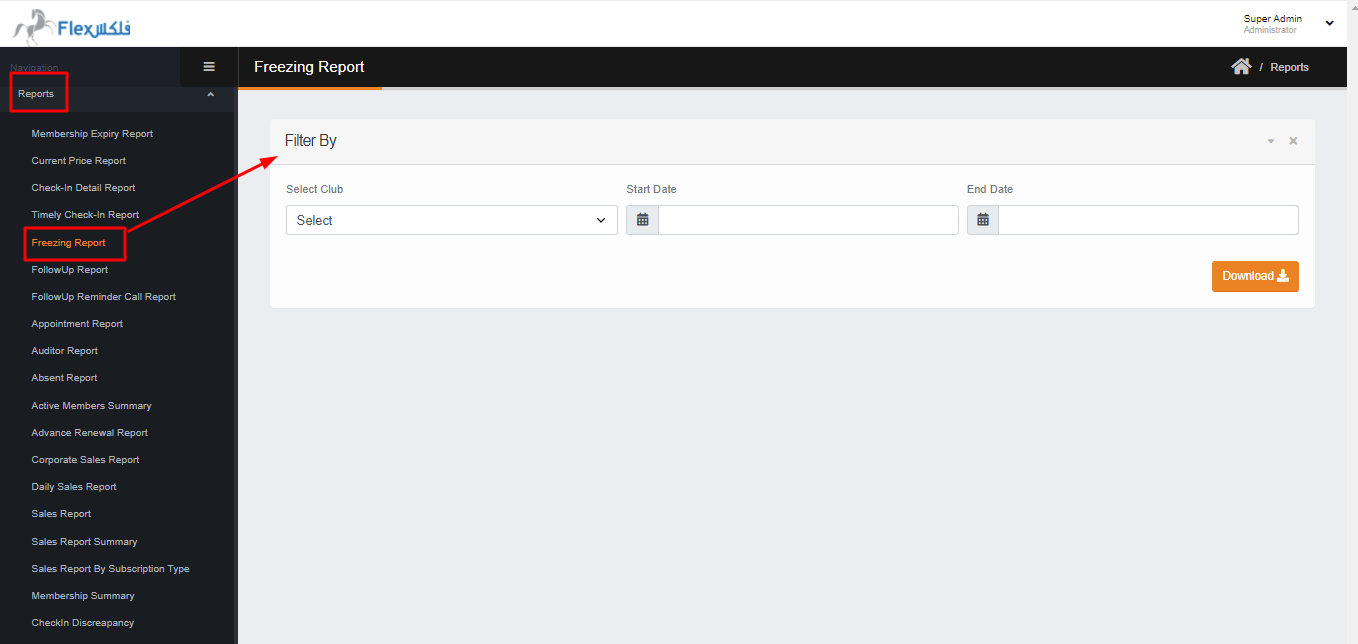](https://flex.doc.exodevs.com/uploads/images/gallery/2022-05/freezing-report.png)[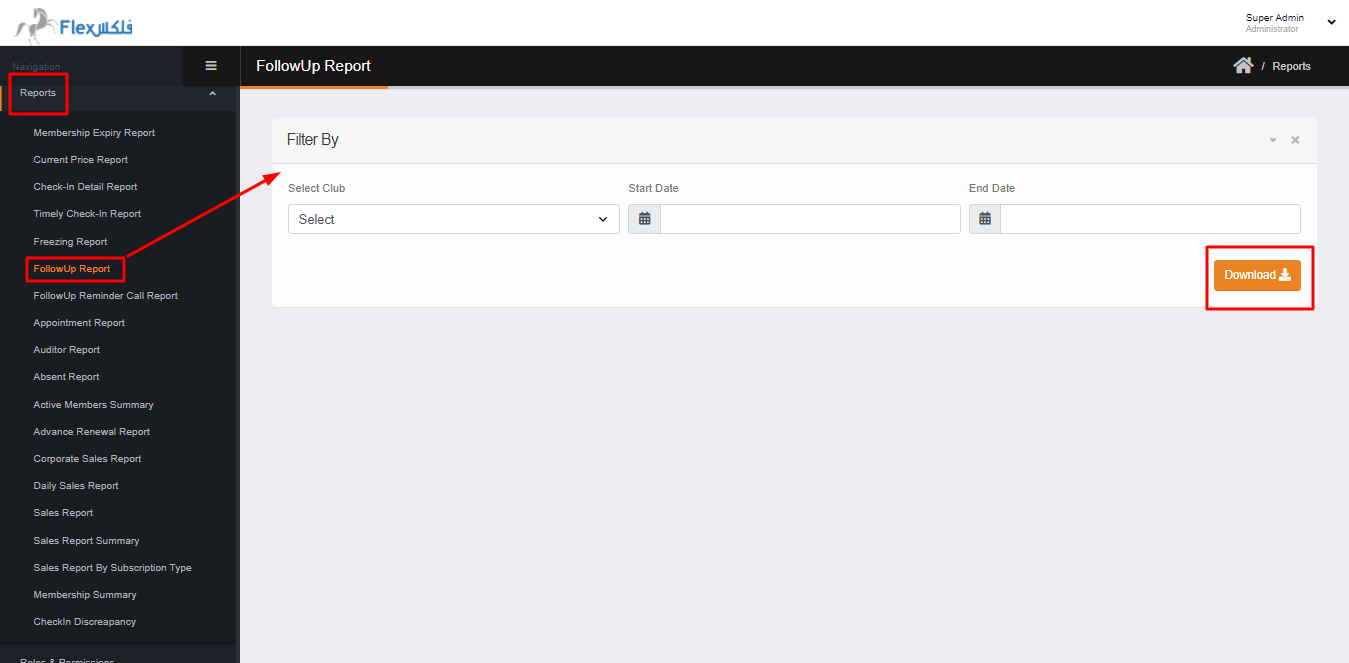](https://flex.doc.exodevs.com/uploads/images/gallery/2022-05/follow-up-report.png)[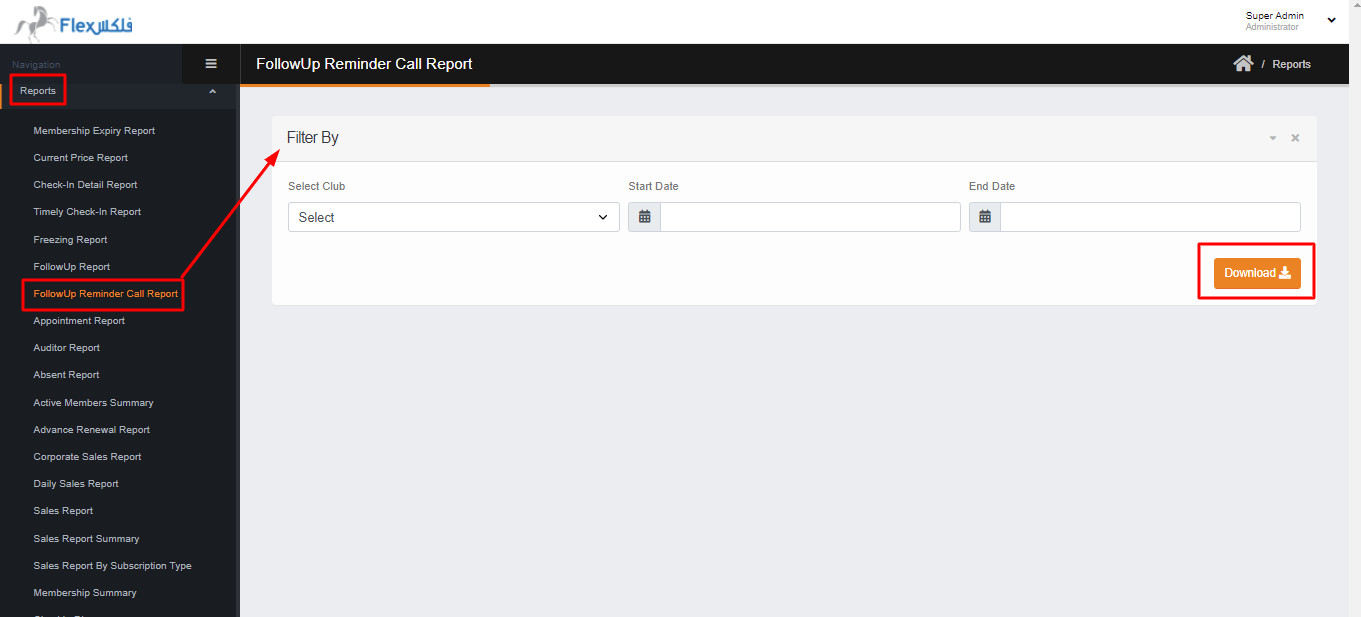](https://flex.doc.exodevs.com/uploads/images/gallery/2022-05/follow-up-reminder.png)
[](https://flex.doc.exodevs.com/uploads/images/gallery/2022-05/appointment-report.png)[](https://flex.doc.exodevs.com/uploads/images/gallery/2022-05/auditor-report.png)[](https://flex.doc.exodevs.com/uploads/images/gallery/2022-05/absent-report.png)[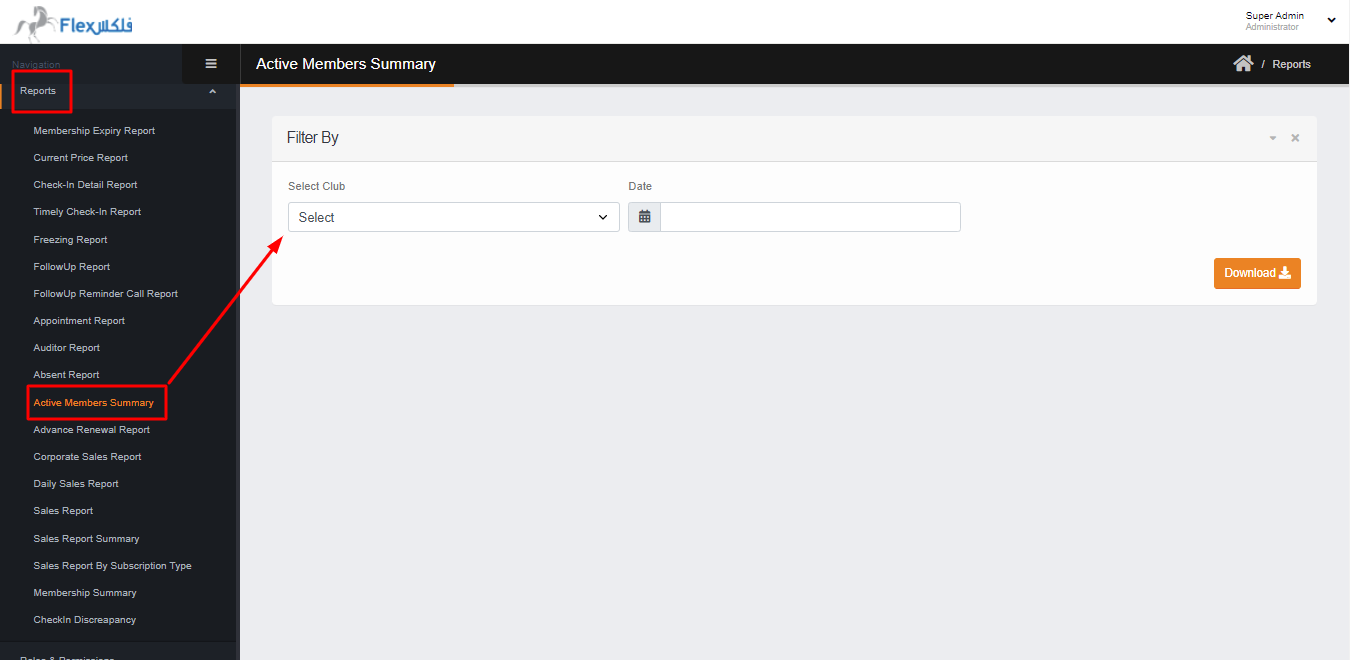](https://flex.doc.exodevs.com/uploads/images/gallery/2022-05/active-member-report.png)[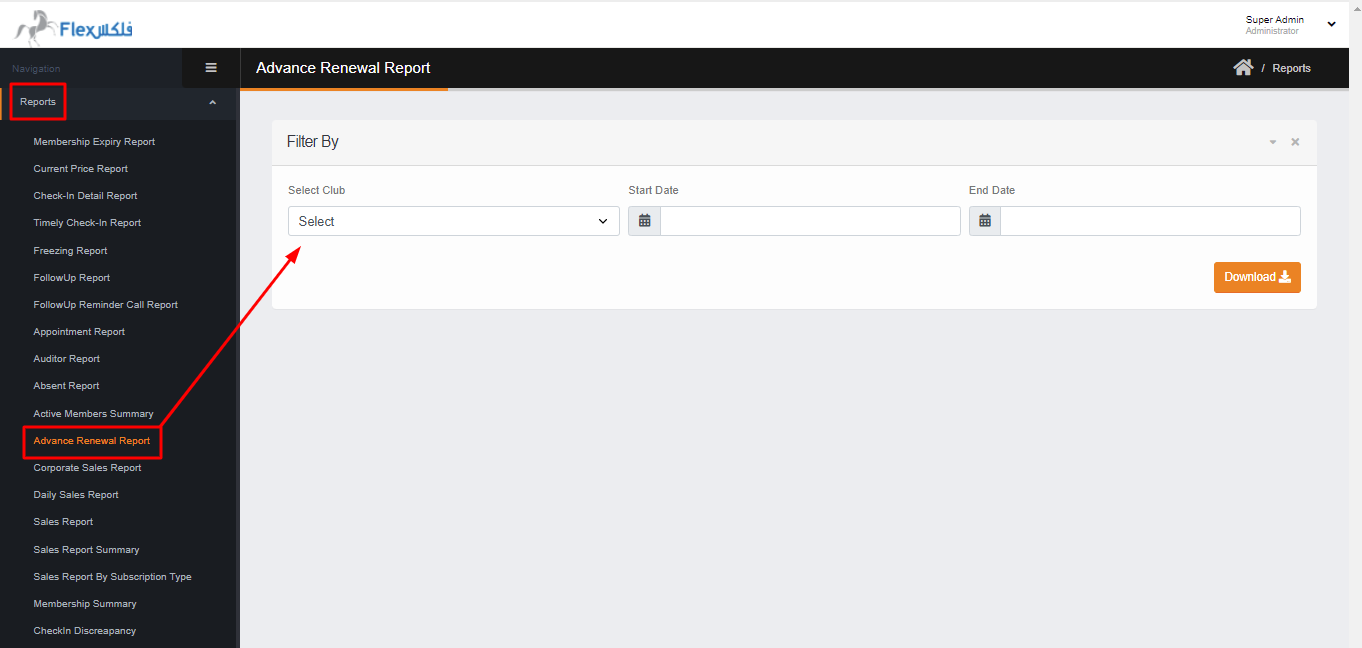](https://flex.doc.exodevs.com/uploads/images/gallery/2022-05/advance-renewal-report.png)[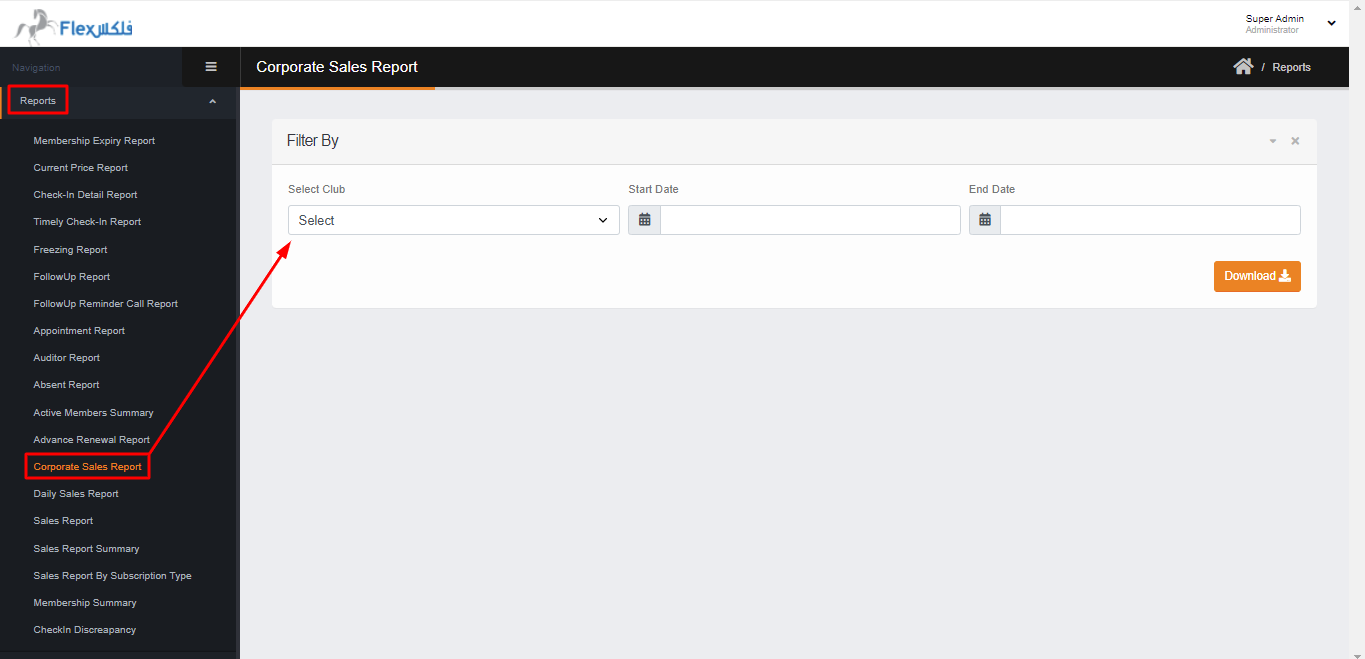](https://flex.doc.exodevs.com/uploads/images/gallery/2022-05/corporate-sales-report.png)[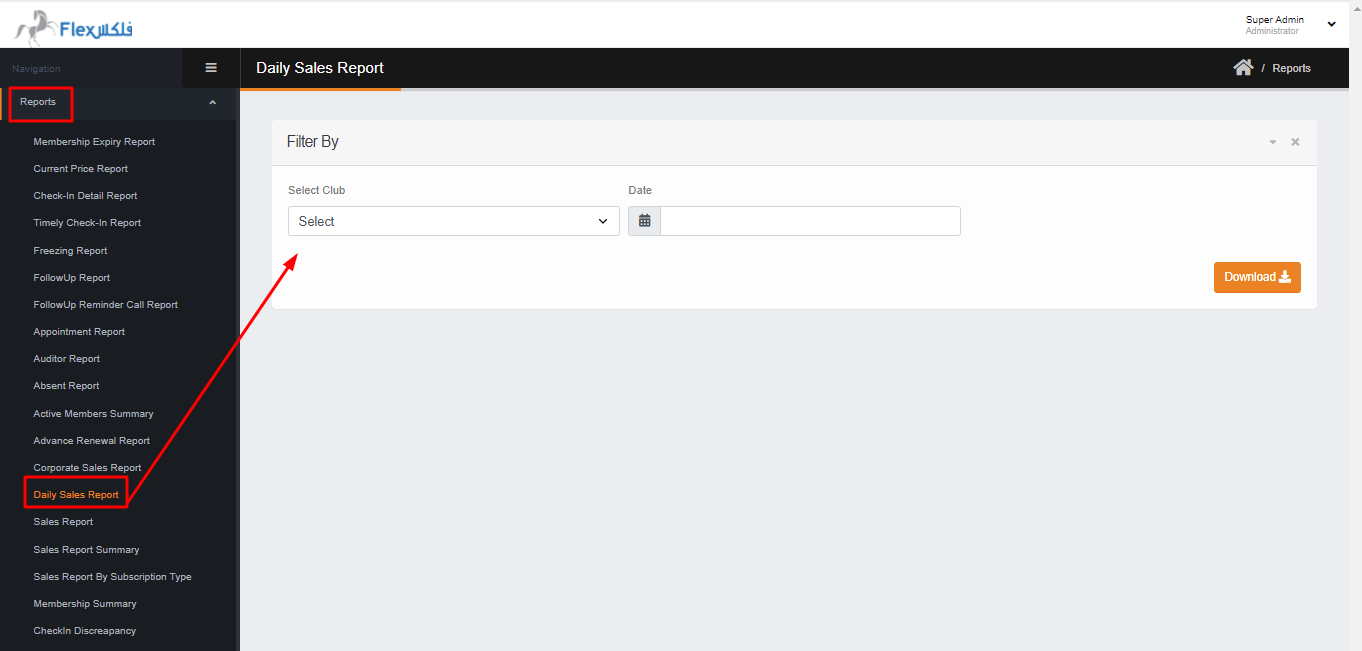](https://flex.doc.exodevs.com/uploads/images/gallery/2022-05/daily-sales-report.png)[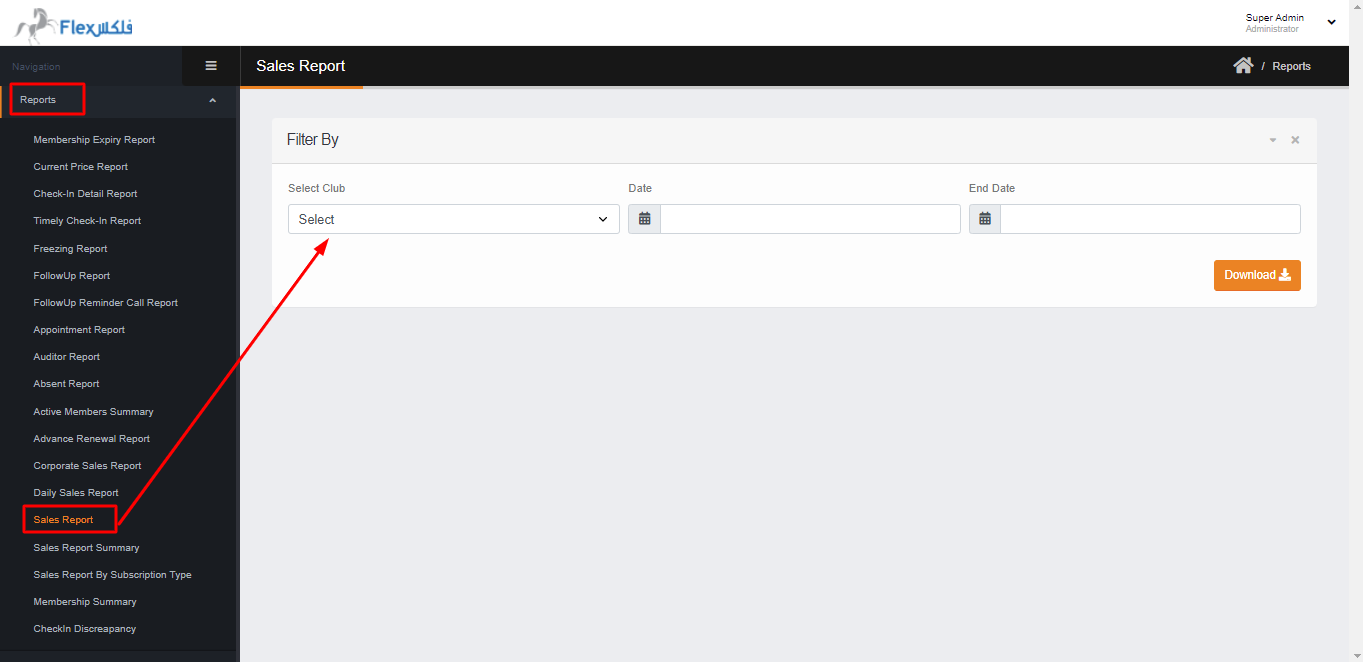](https://flex.doc.exodevs.com/uploads/images/gallery/2022-05/sales-report.png)[](https://flex.doc.exodevs.com/uploads/images/gallery/2022-05/sales-report-summary.png)[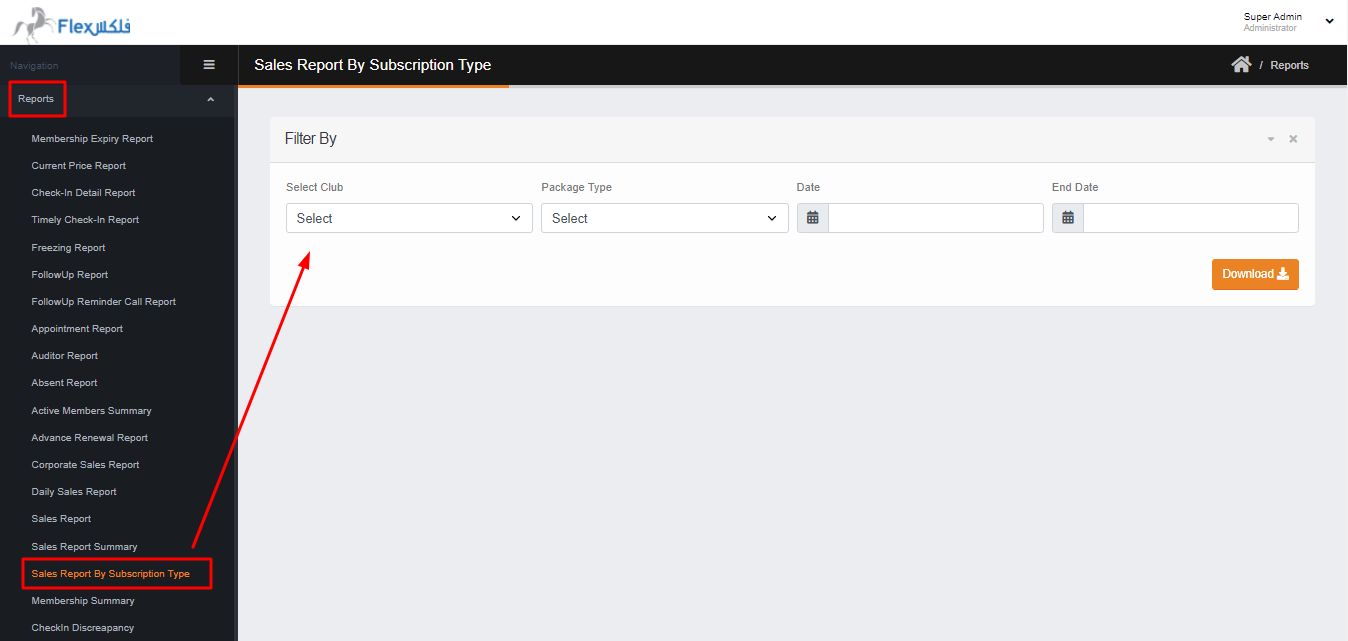](https://flex.doc.exodevs.com/uploads/images/gallery/2022-05/sales-report-by-subscription-type.png)[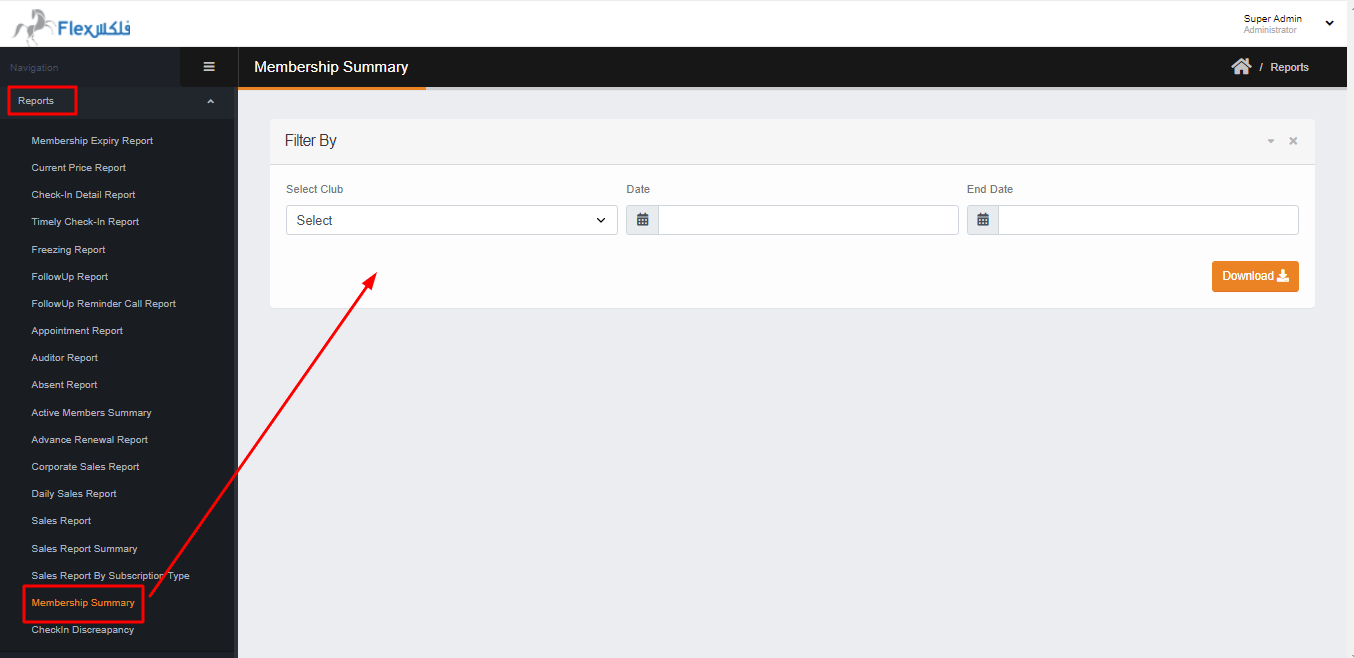](https://flex.doc.exodevs.com/uploads/images/gallery/2022-05/membership-summary.png)[](https://flex.doc.exodevs.com/uploads/images/gallery/2022-05/check-in-discrepency-report.png)
# News/ Add New News
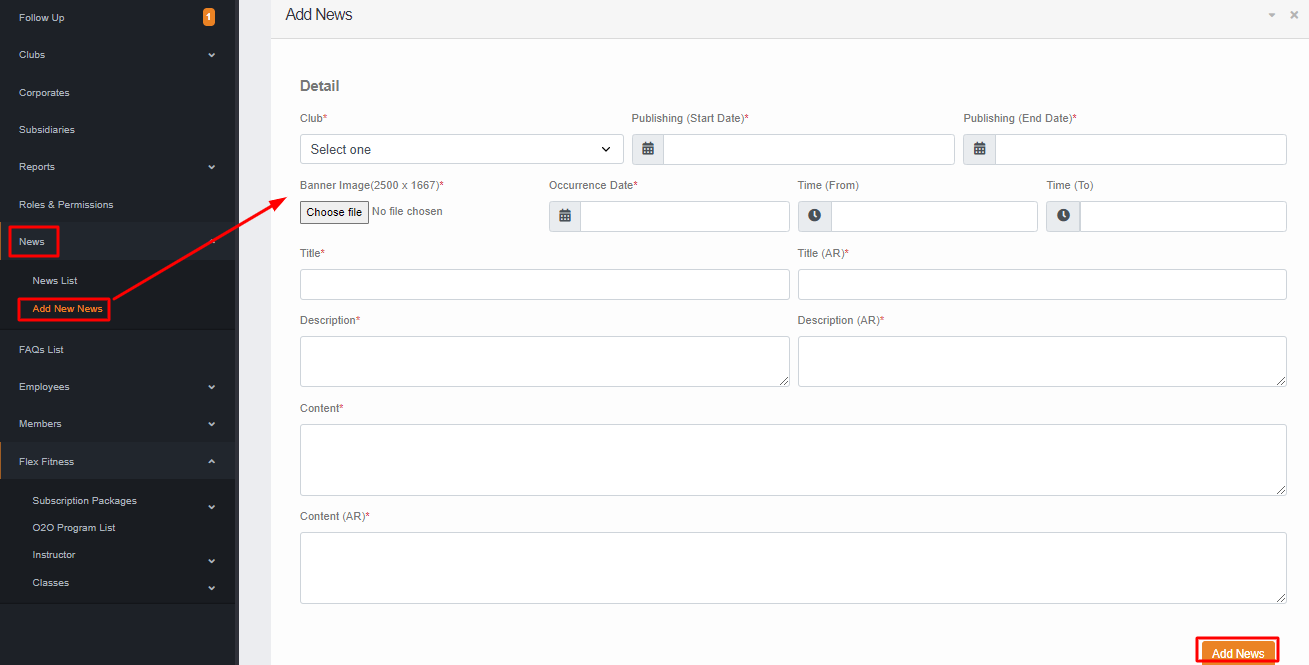
In the news section, you can add the News & Event that will appear on the website & Mobile.
To add the news you have to click on **ADD NEW NEWS** where you have to
- Select the club.
- Select the **publishing start date & End date** for when the news will be published for the member/public.
- Select the banner image up to **2500\*1667**
- Select the news **occurrence** date.
- Select Start & End time for the news. (optional)
- Give **News Title** in **ENG & AR** for the News & Event.
- Give the **News Description** in **ENG & AR** up to 180 characters.
- Give the Content of the news & event in ENG & AR. Then click on **ADD NEWS** the news will be added and you can see the news from NEWS LIST.
[](https://flex.doc.exodevs.com/uploads/images/gallery/2022-05/6zBadd-news.png)
# News/ News List
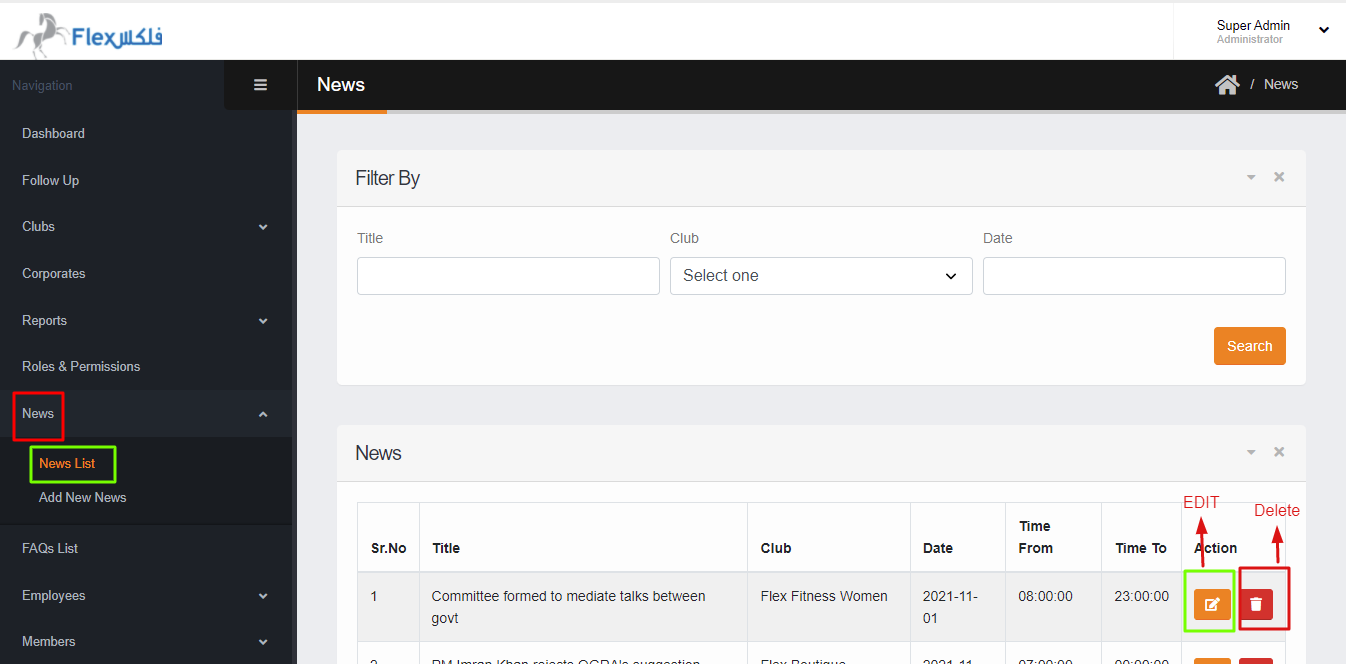
In this section, you can **Edit** & **Delete** the news. Also, you can search the existing news by the **News Title**, **Choose Club**, or **Publishing date** of the news.
In the result, if we choose only **Publishing Date** it will show the result from the selecting date to onward.
[](https://flex.doc.exodevs.com/uploads/images/gallery/2022-05/news-list.png)
# FAQs List
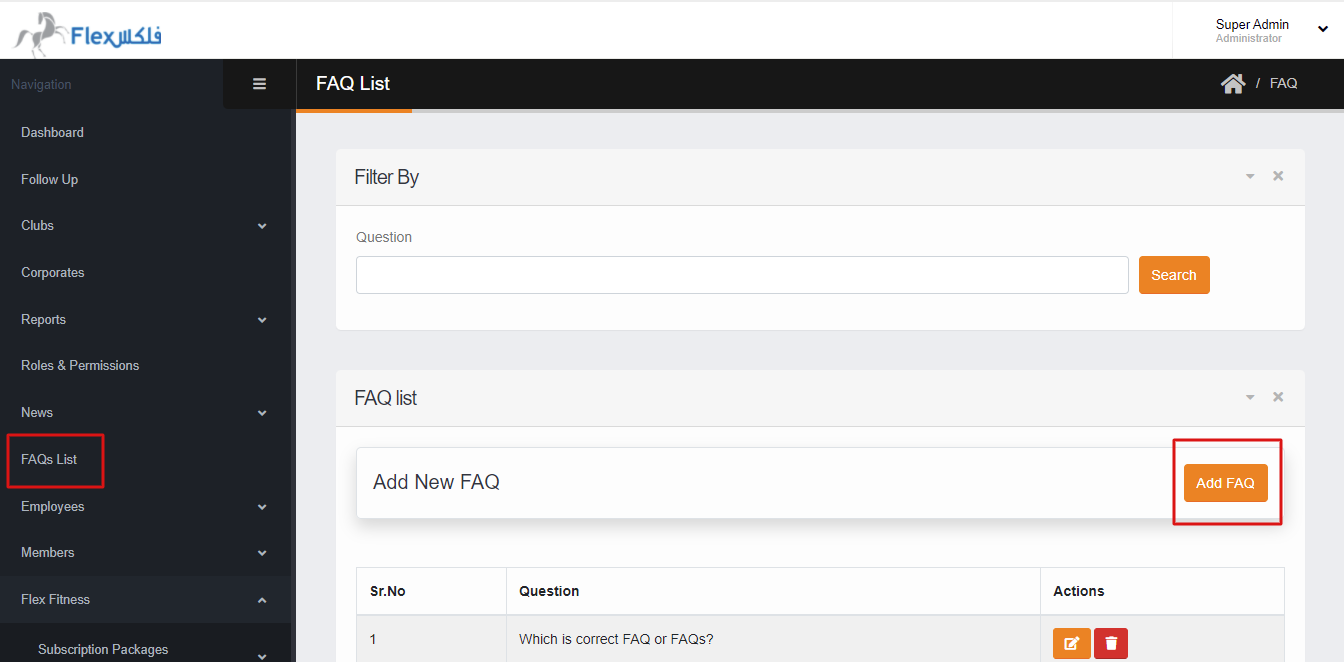
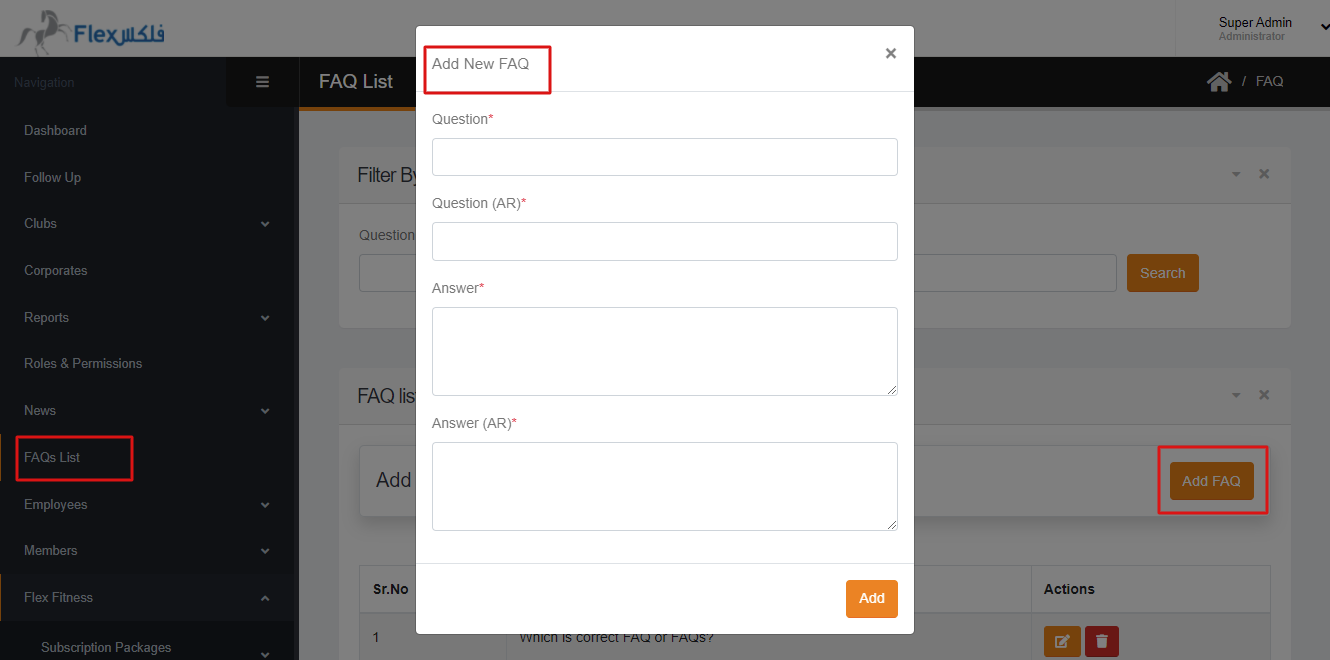
In this section, You can **ADD** the FAQ by clicking on the **ADD FAQ**. In this section, you can also **Edit** & **Delete** the FAQ. Also, you can search the FAQ by Question Only.
[](https://flex.doc.exodevs.com/uploads/images/gallery/2022-05/faq-list.png)
[](https://flex.doc.exodevs.com/uploads/images/gallery/2022-05/add-faq.png)[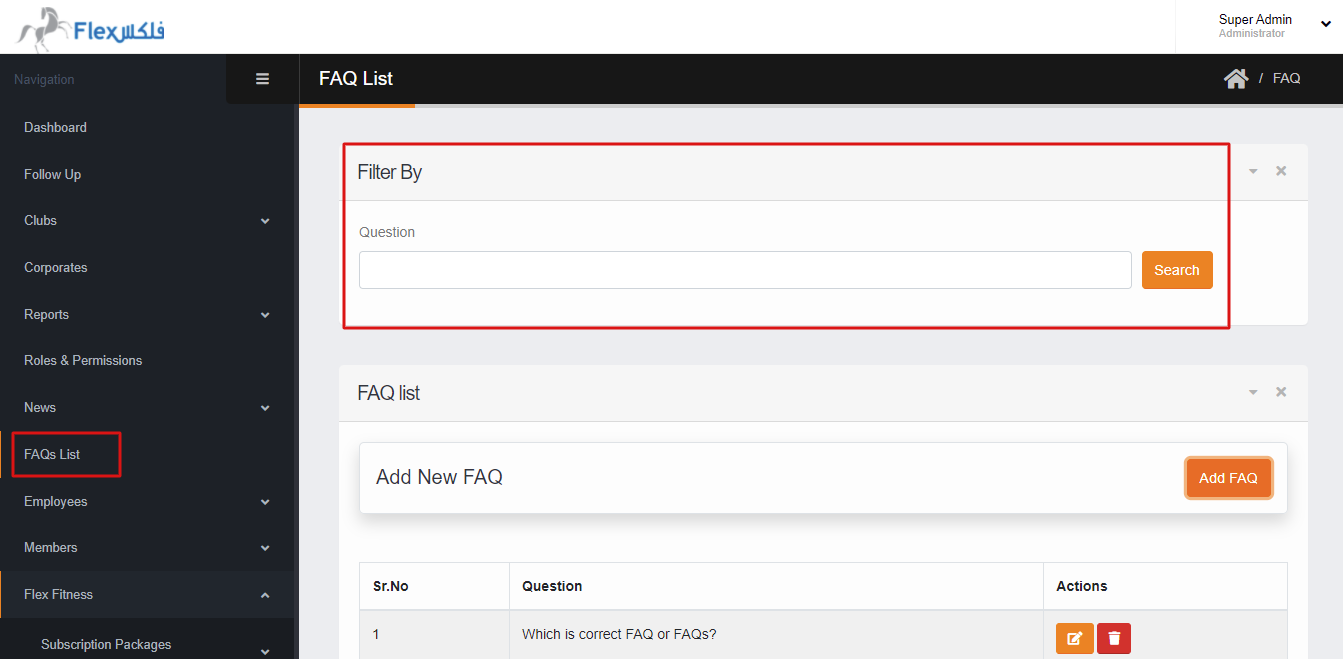](https://flex.doc.exodevs.com/uploads/images/gallery/2022-05/faq-filter.png)
# Employee / Employee List
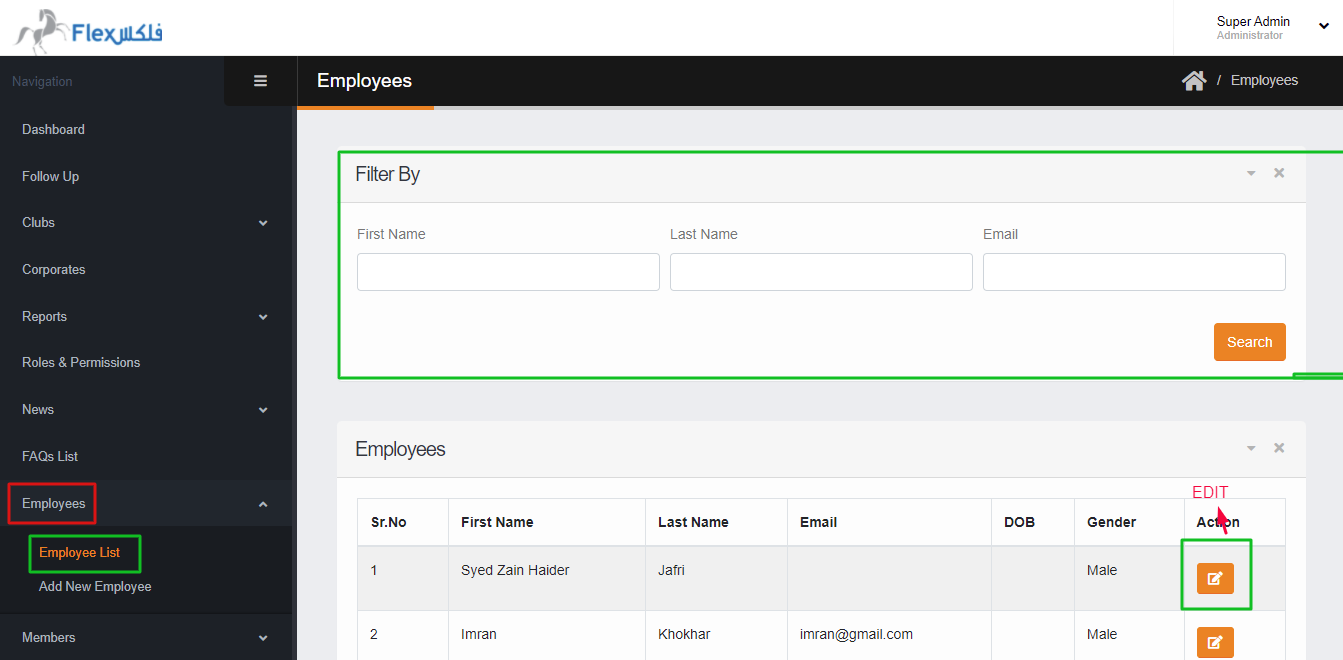
In this section, the Employee can be searched by FIRST NAME, LAST NAME, AND EMAIL. Also, you can be **Edit** the employee profile by clicking on the **Edit button**.
[](https://flex.doc.exodevs.com/uploads/images/gallery/2022-05/employee-list.png)
# Employee/ Add New Employee
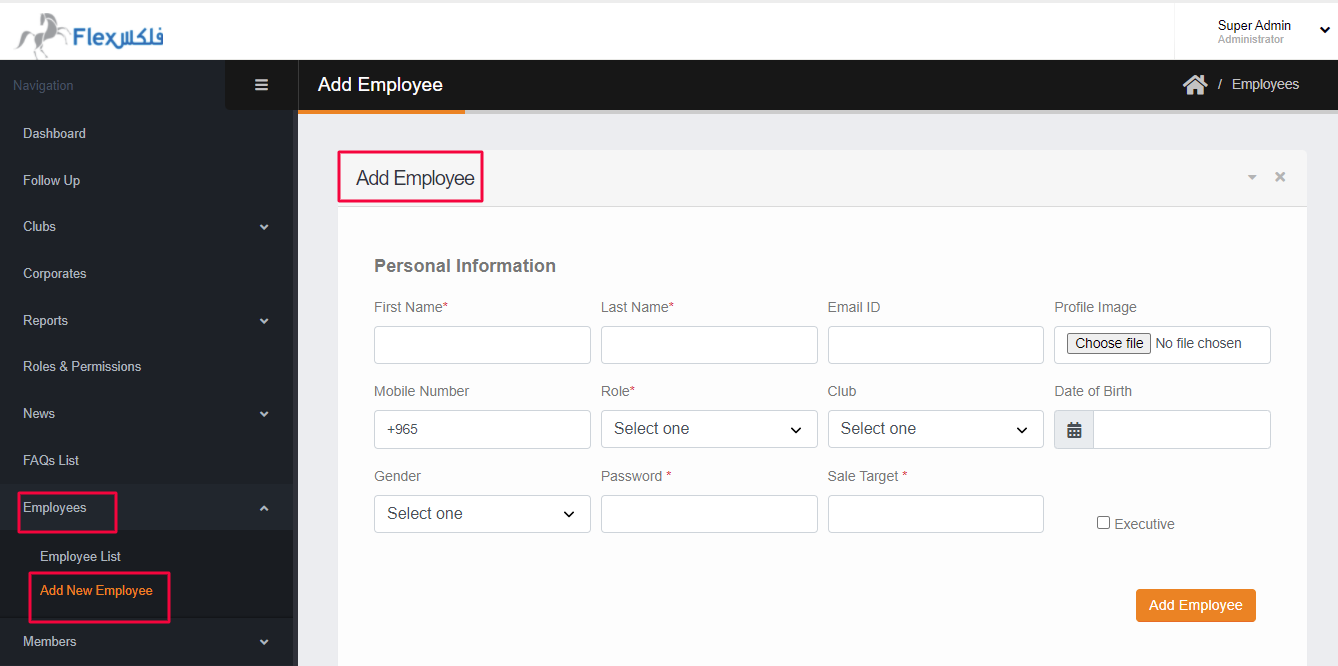
In this section, an Employee can be registered or added manually. You can give the employee information & assign the role to the employee, also when you check the **EXECUTIVE** option the employee will appear on the about us page in the **Executive section**.
The following are the required field to add the employee.
- First name & last name
- Mobile Number
- Role
- Password
- Sale target
[](https://flex.doc.exodevs.com/uploads/images/gallery/2022-05/add-employee.png)
# Members/ Members List
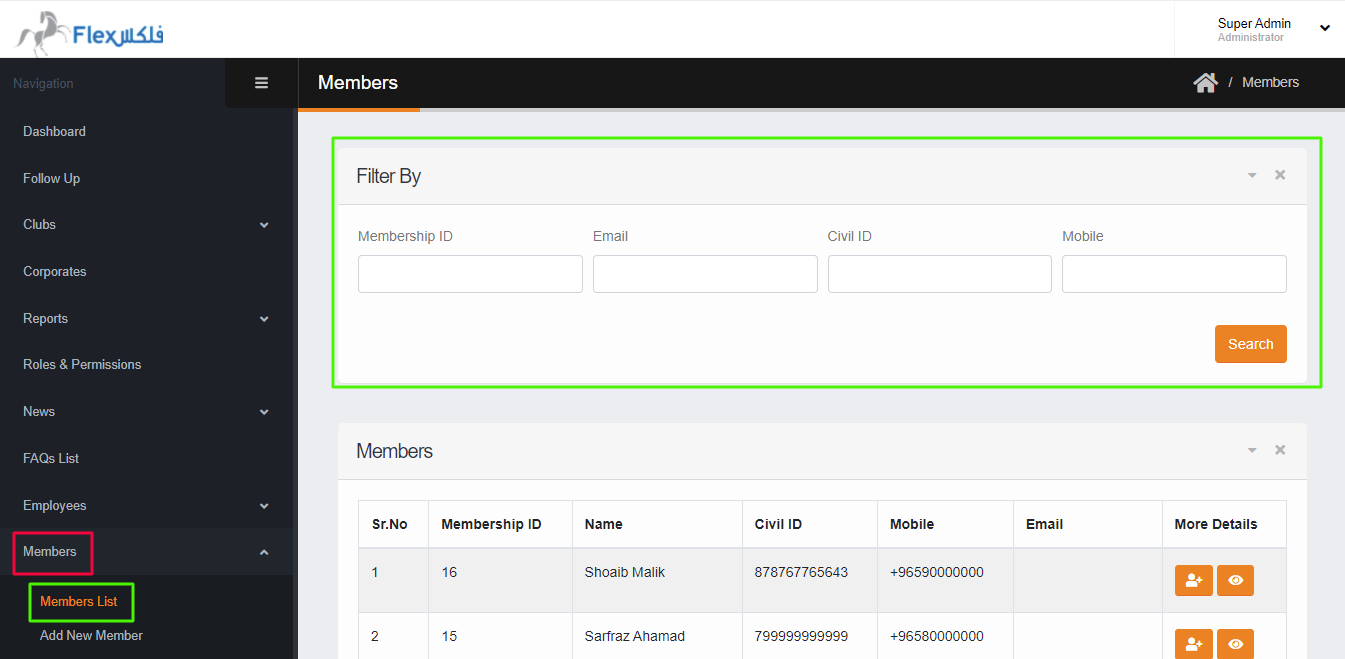
- In this section, members can be searched by **Membership ID**, search by **Email,** search by **CIVIL ID**, search by **Mobile Number**. Also, you can ADD manual **CHECK-IN** against the member.
[](https://flex.doc.exodevs.com/uploads/images/gallery/2022-05/member-list.png)[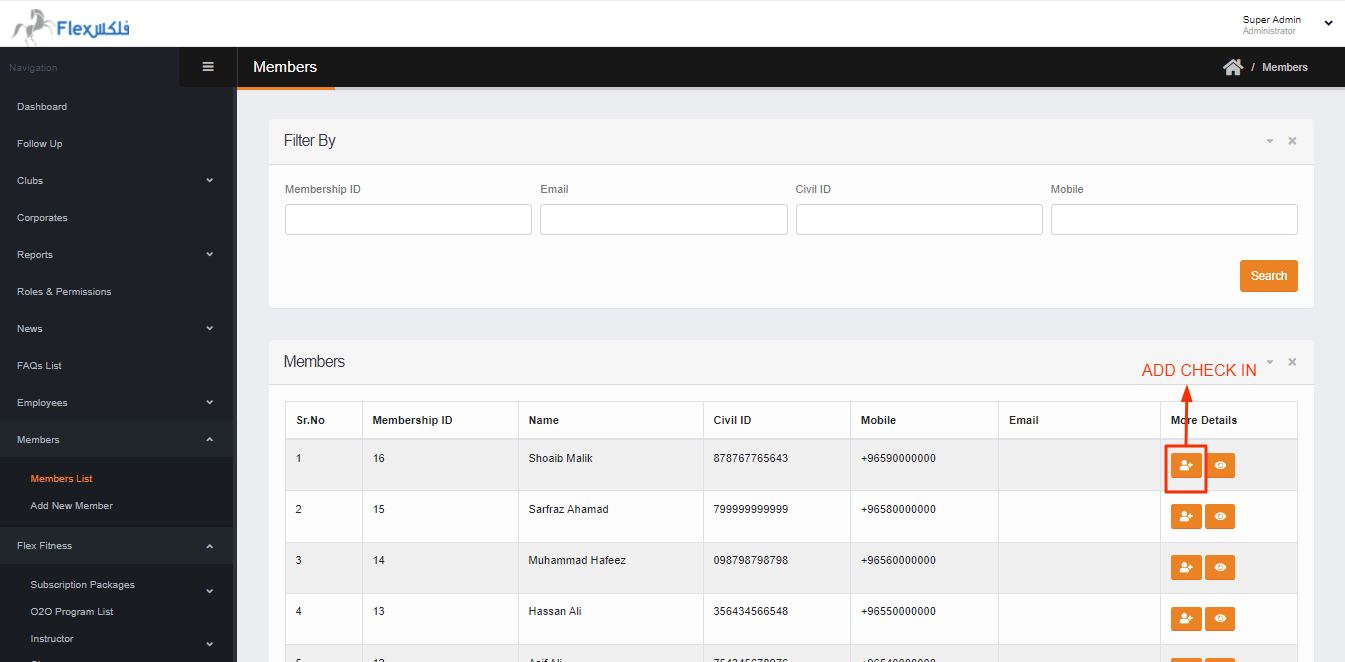](https://flex.doc.exodevs.com/uploads/images/gallery/2022-05/add-check-in.png)
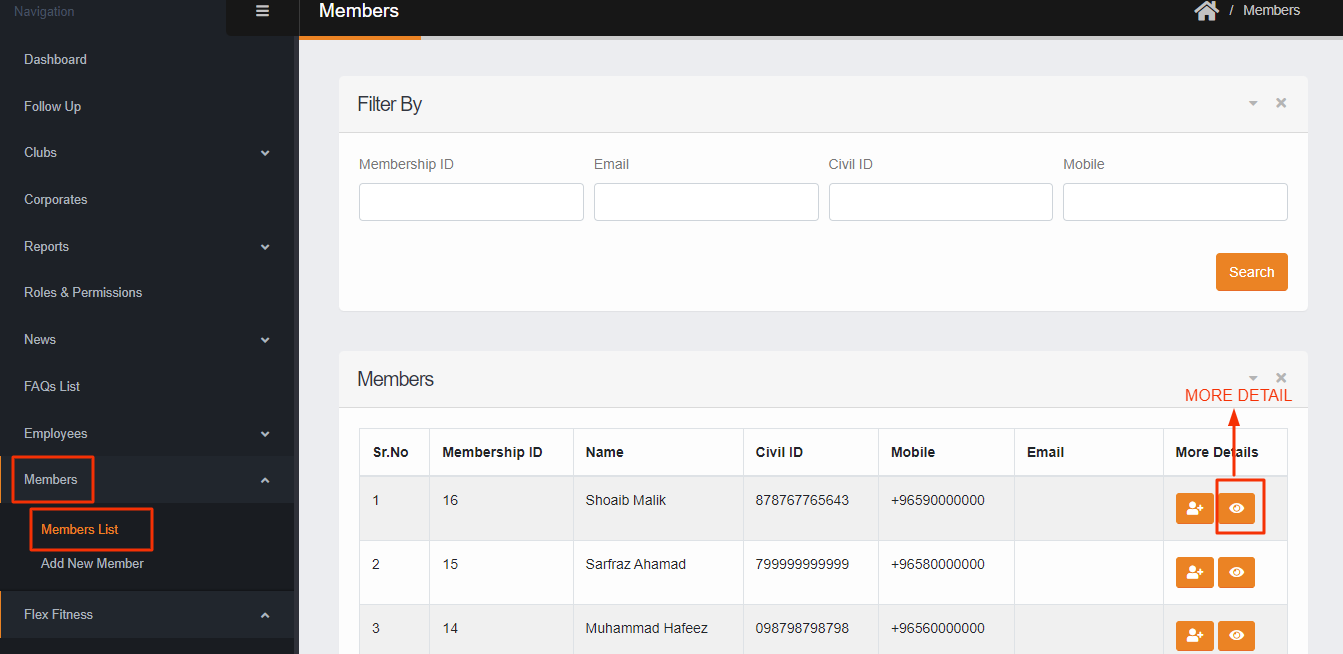
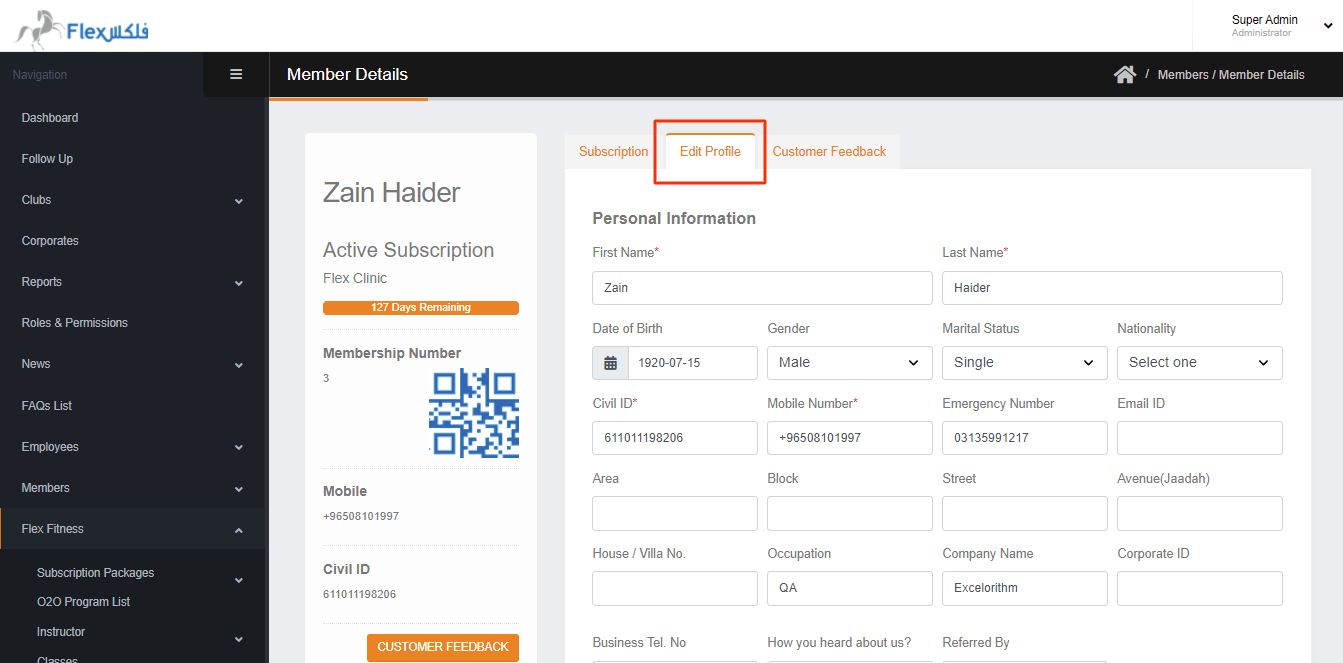
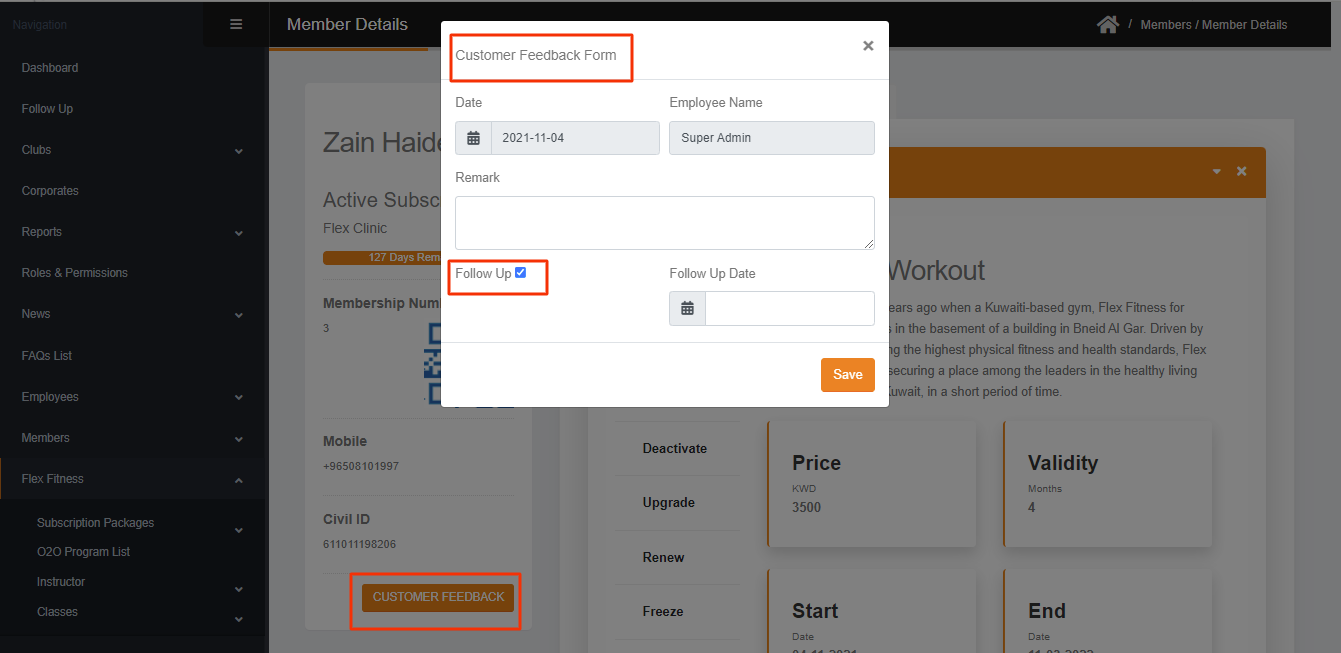
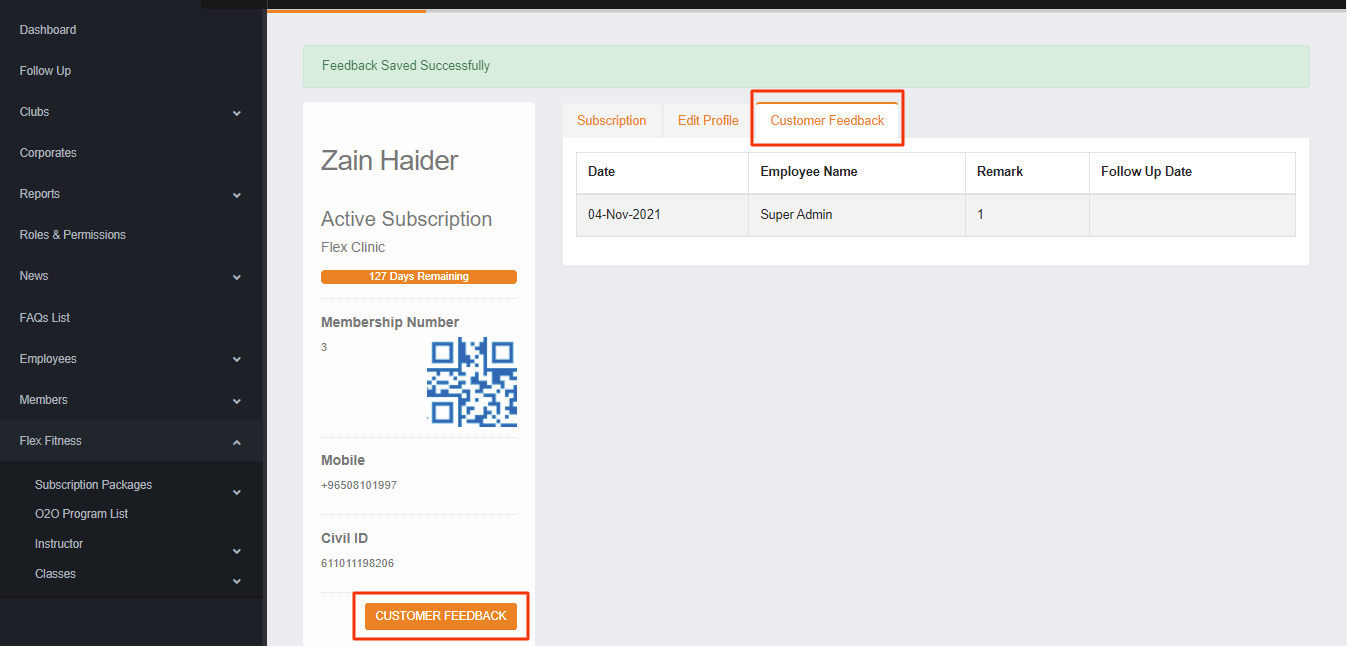
- Member can be edited by clicking on Member **More Detail** also you can add the member **check-in** In **More Detail** you can edit the **Member Profile**, **Add customer feedback**, **Add follow-up** against the member. In **Member Details** you can check the package **Remaining Days** for the member, also you can check the **Membership ID**, **QR**, **Mobile Number** & **Civil ID**.
[](https://flex.doc.exodevs.com/uploads/images/gallery/2022-05/more-detail.png)
[](https://flex.doc.exodevs.com/uploads/images/gallery/2022-05/edit-profile.png)
[](https://flex.doc.exodevs.com/uploads/images/gallery/2022-05/customer-feedback.png)
[](https://flex.doc.exodevs.com/uploads/images/gallery/2022-05/customer-feedback-1.png)
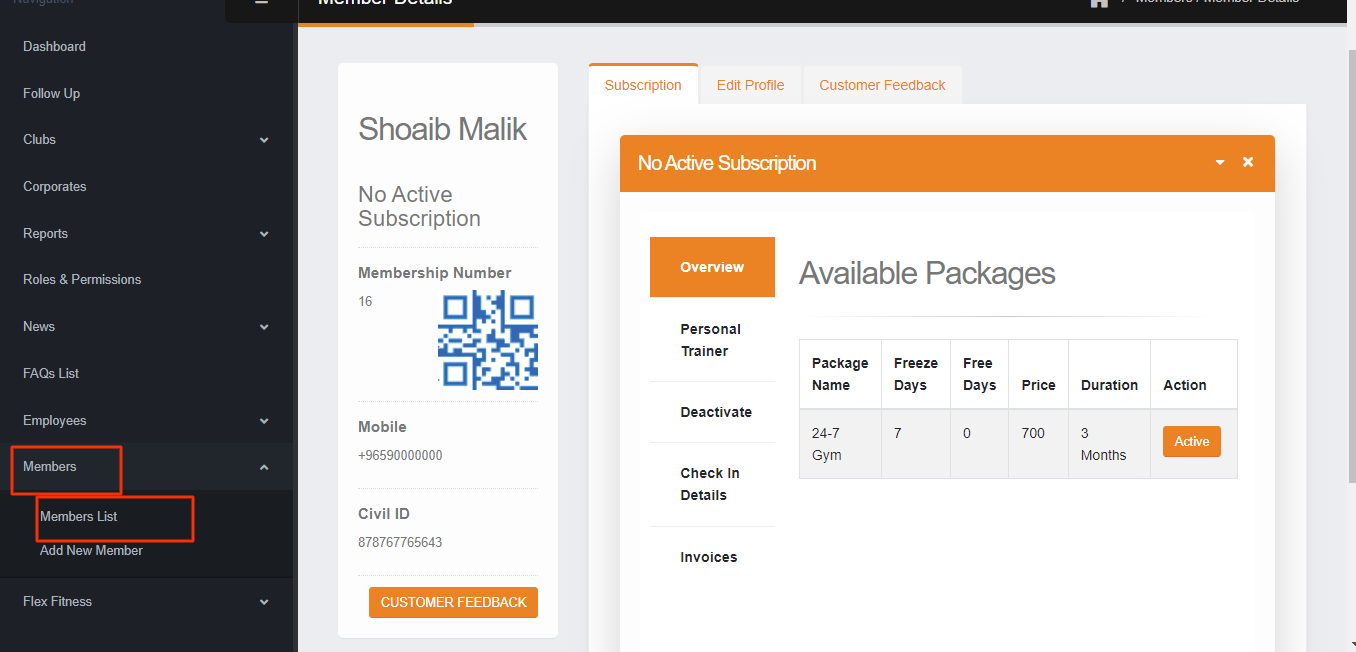
- In More Detail, we have **Overview** about the member where we See detail related to the member subscribed package. In **Overview** section, when user subscribe the package from **Mobile or website** it will be activated when member **check-in** or it will be automatically activated on the **30th day** after the subscription. Except this the package will not activated and it will show under the **Overview** section.
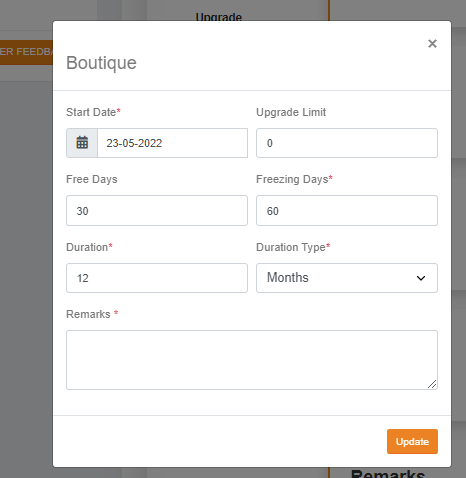
Also in this section, You can Edit the following fields from the subscribe package against the member.
1. **Start date:** if you Edit the **start date** from the previous dates, the package will expire, and if you select the **start date** from upcoming day the package will start on the selected date.
2. **Upgrade Limit:**
3. **Free days : **When you add the free days, it will be add in the package and it will effect on the specific member only. **
**4. **Freezing Days:** When you Edit the freezing days, it will increase or decrease the freezing limit against the specific member.
5. **Duration:** when you Edit the Duration, it will increase or decrease the expiry of the package.
6. **Duration Type:** When you Edit the duration Type, it will change the package duration i.e. Month to days or vice versa.
7. **Remarks:** In this section those who edit the package detail and why the package edited can give the remarks.
[](https://flex.doc.exodevs.com/uploads/images/gallery/2022-05/overview.png)
[](https://flex.doc.exodevs.com/uploads/images/gallery/2022-05/package-edit.png)
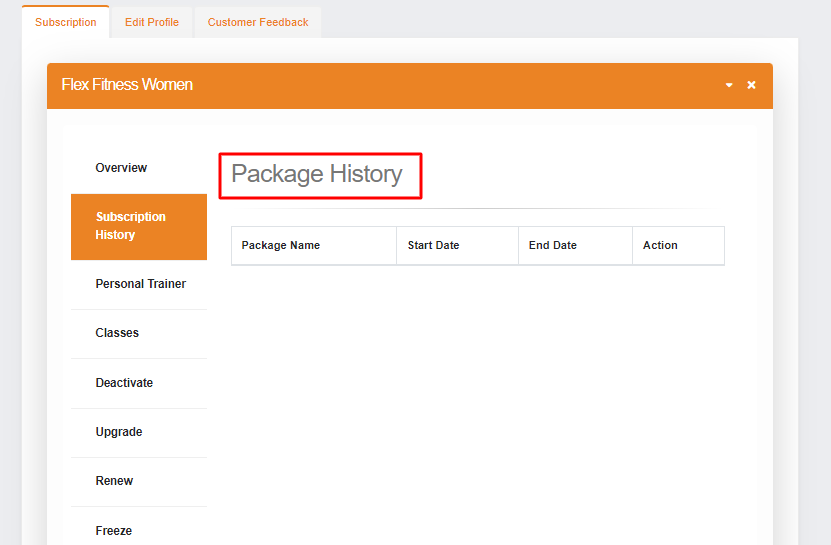
- **Subscription History:** In this section, you can see all the previous subscription detail of the member. It will update when the ongoing subscription will expire, otherwise it will show empty.
[](https://flex.doc.exodevs.com/uploads/images/gallery/2022-05/S19subscription-history.png)
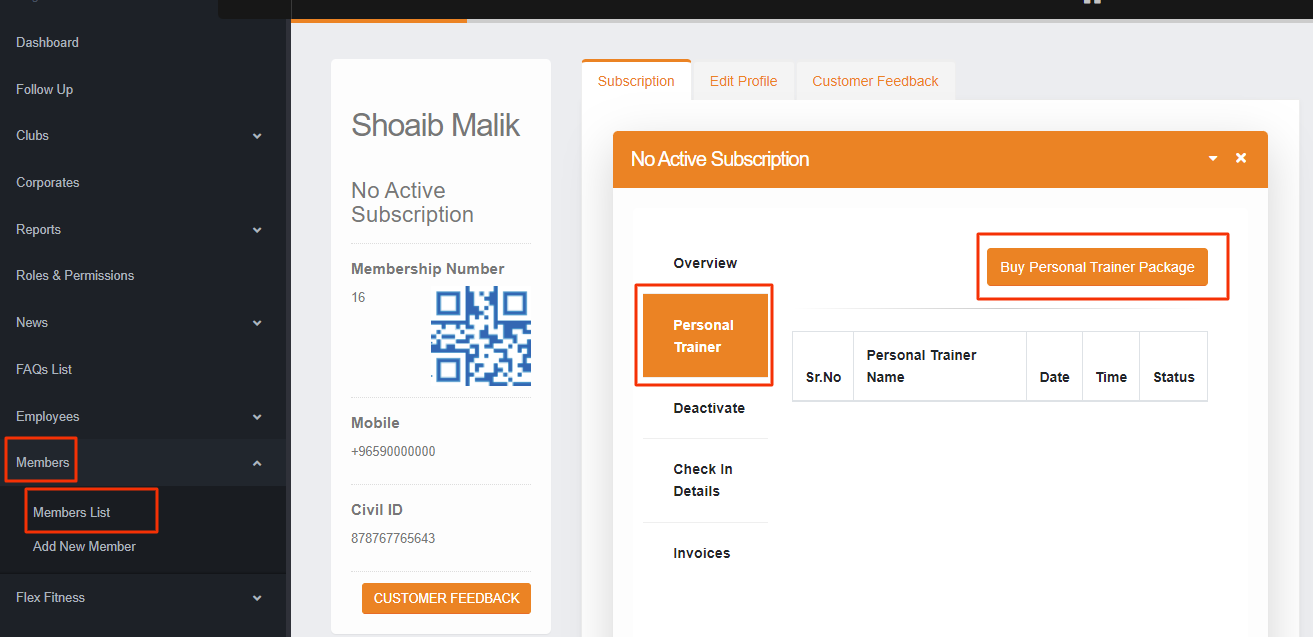
- You can subscribe to the **Personal Trainer** by clicking on **BUY PERSONAL TRAINER PACKAGE** where you will See all existing PT Package. Then click on BUY PACKAGE. If you has an active subscription then you can see only the PT package against that club.
[](https://flex.doc.exodevs.com/uploads/images/gallery/2022-05/pt-package.png)
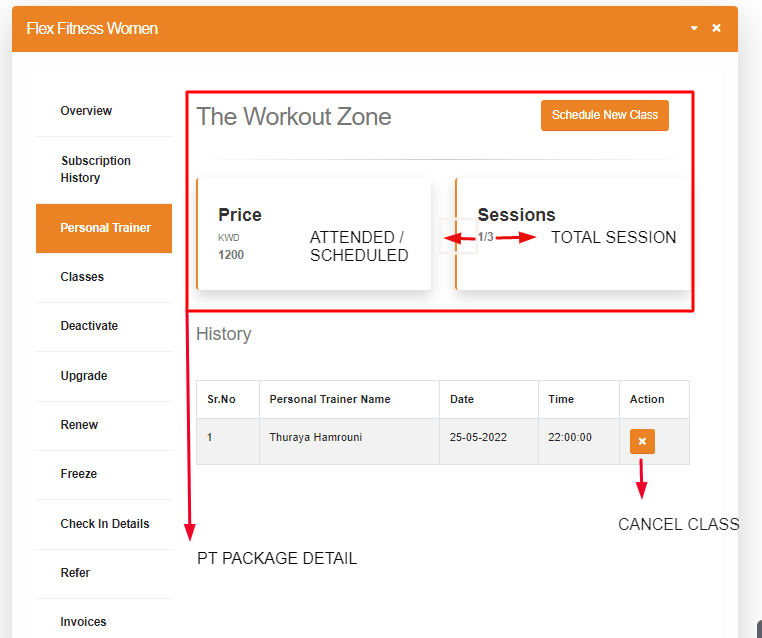
- After subscribing to the PT package you can schedule the PT session by clicking on **Schedule New Class** for the member in the personal trainer package. Where you can select the PT package, Date & Time to schedule the class. Also you can check that how many session did the member attend, Here also you can **cancel** the **scheduled class**
[](https://flex.doc.exodevs.com/uploads/images/gallery/2022-05/pt-package-list.png)
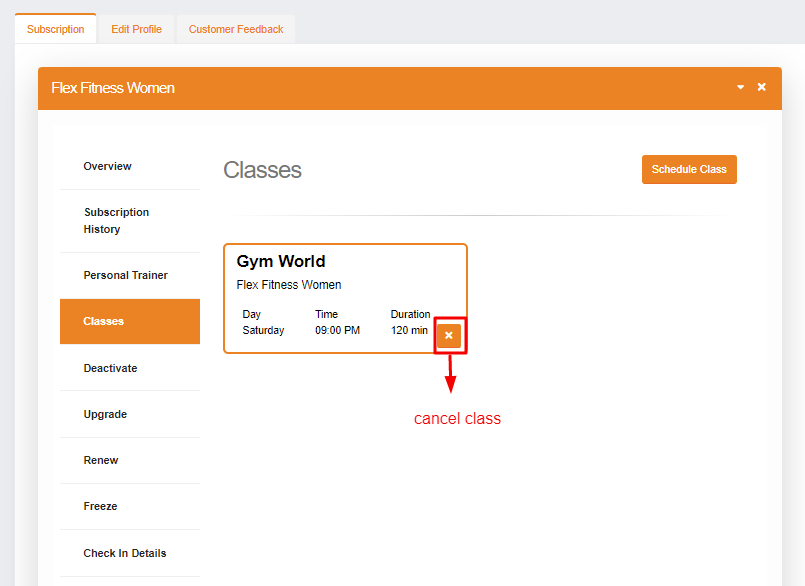
- In More Detail of the member, you can schedule the Classes within the **three days** by clicking on **Schedule Class** from the **CLASS** section. Also you can **cancel** the class before the ****scheduled time.
[](https://flex.doc.exodevs.com/uploads/images/gallery/2022-05/U10classes.png)****
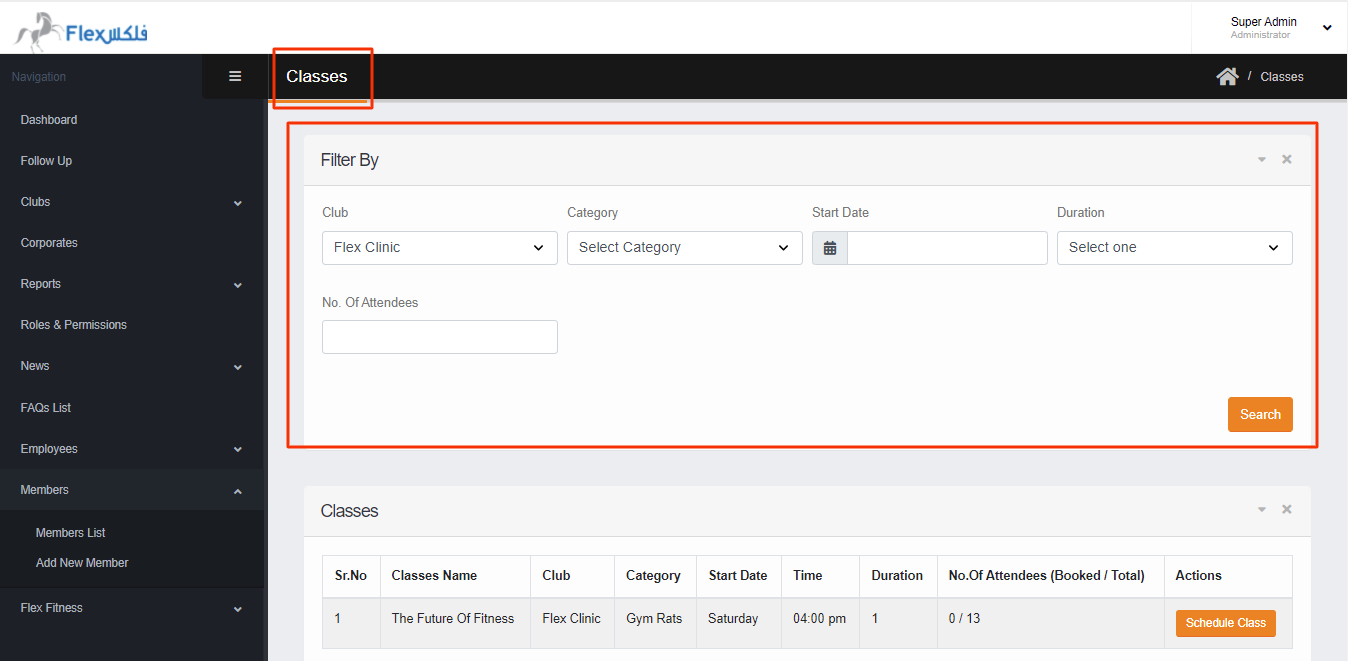
- Also in Classes section --> Schedule Class --> The Class can be searched by following things
1. Search by Club
2. Search by category
3. Search by start date
4. Search by Duration(min)
5. Search by No Of Attendees
[](https://flex.doc.exodevs.com/uploads/images/gallery/2022-05/class-search-filter.png)
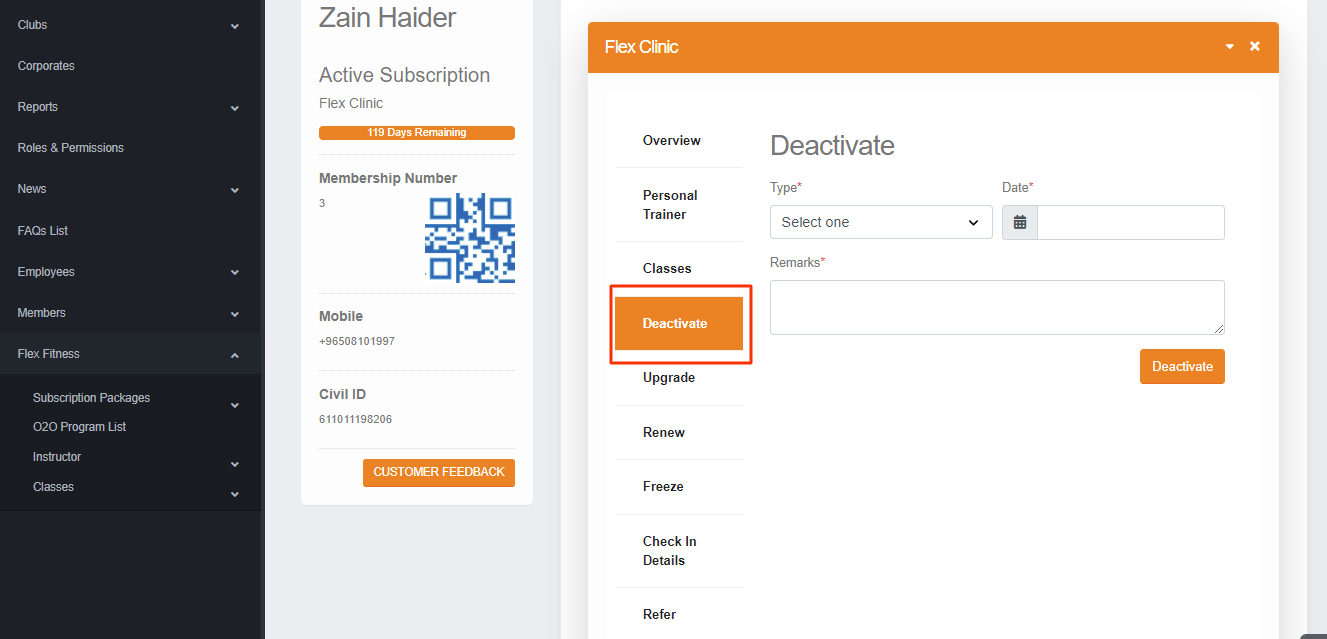
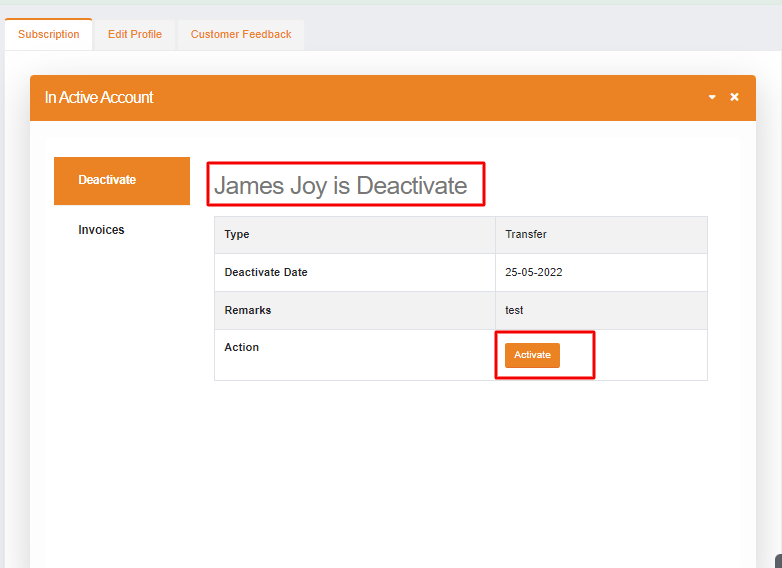
- **Deactivate:** Member can be Deactivated and Activated from the Deactivate option in member detail section. When the user is **deactivated** the other option in **More detail** of the specific member will be hidden until the further action. So if user is deactivated then the member will not be able to **login** in the application or website.
- [](https://flex.doc.exodevs.com/uploads/images/gallery/2022-05/deactivate.png)
[](https://flex.doc.exodevs.com/uploads/images/gallery/2022-05/deactivate-user.png)
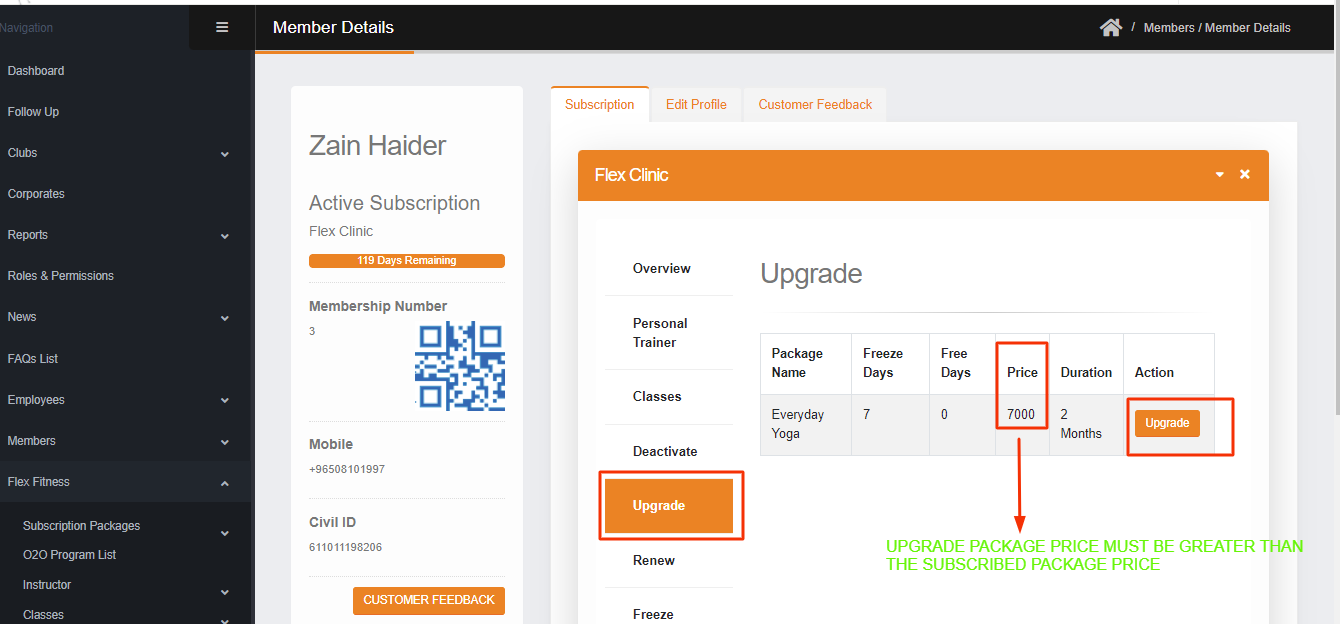
- **Upgrade**: In this section upgrade package will appear, but only those package will appear here which price must be **GREATER** than the subscribed package.
[](https://flex.doc.exodevs.com/uploads/images/gallery/2022-05/upgrade.png)
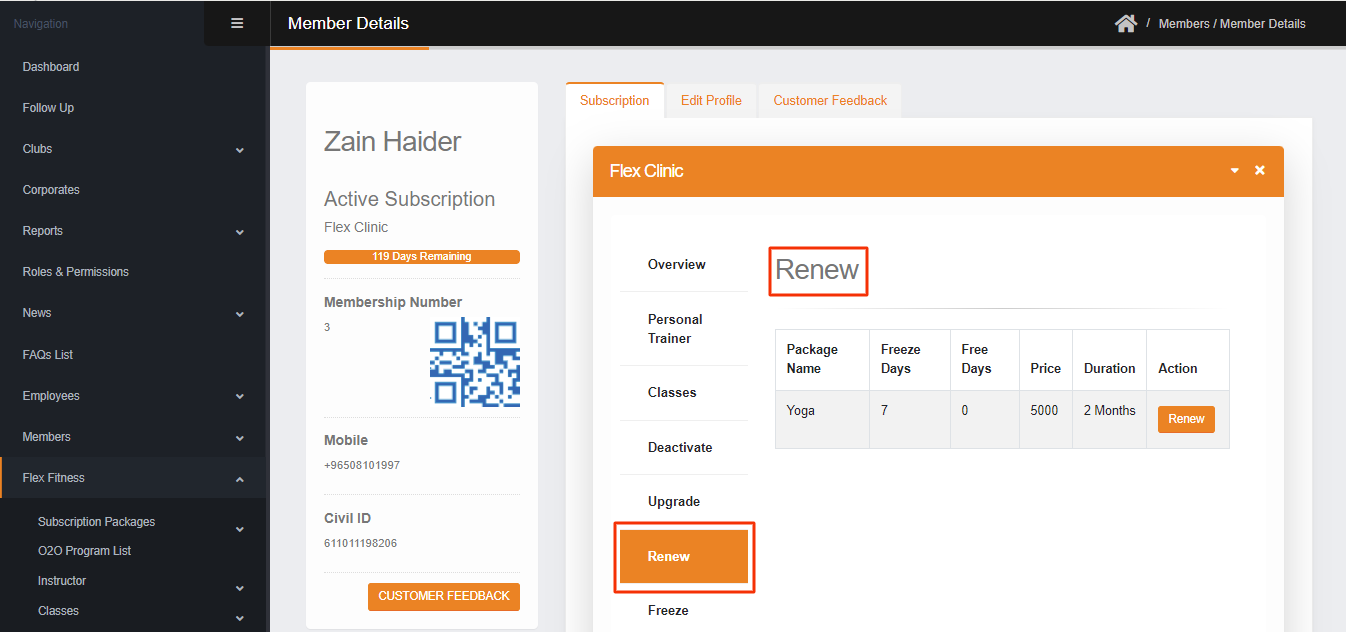
- **Renew**: In this section, the renew package against the subscribed club will appear here.
[](https://flex.doc.exodevs.com/uploads/images/gallery/2022-05/renew.png)
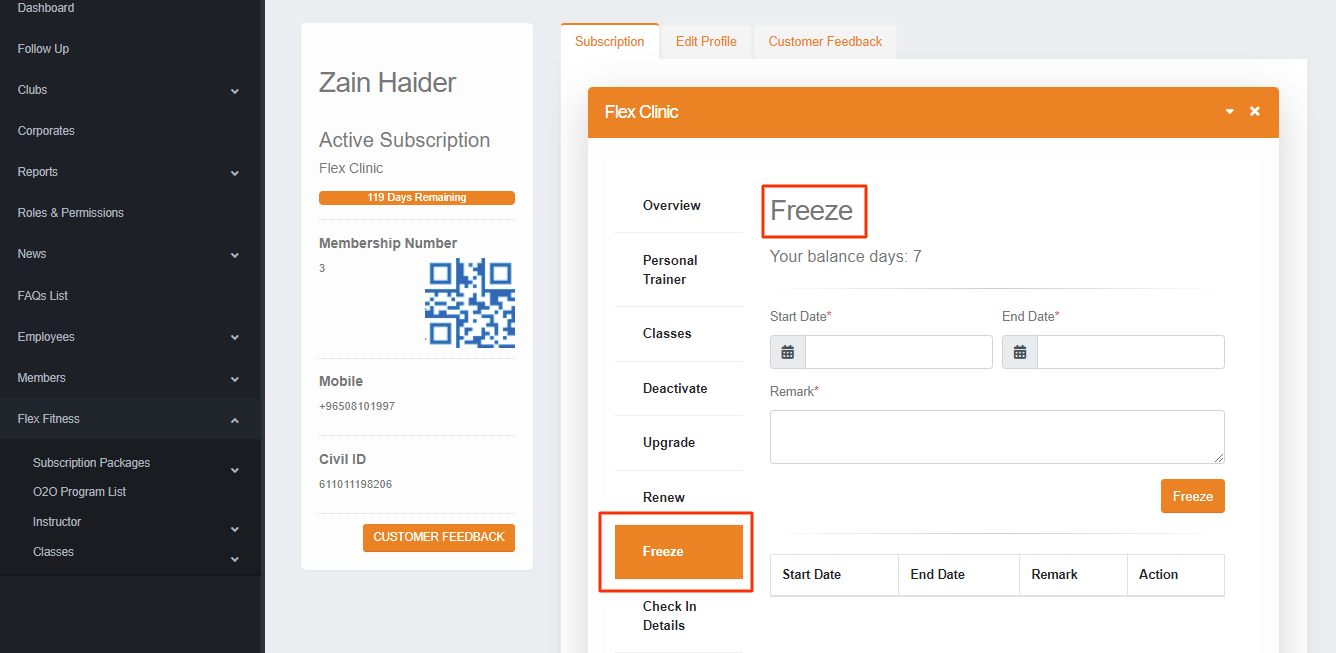
- **Freeze**: In this section, member subscriptions could be **Freeze** and **Unfreeze**. To **Freeze** the subscription you will select the **Start** & **End** date and give remarks then click on the Freeze button. Also, the member can be frozen for a minimum of **7 days**. Except this you can see the history of how many freezing has been taken so far.
[](https://flex.doc.exodevs.com/uploads/images/gallery/2022-05/freeze.png)[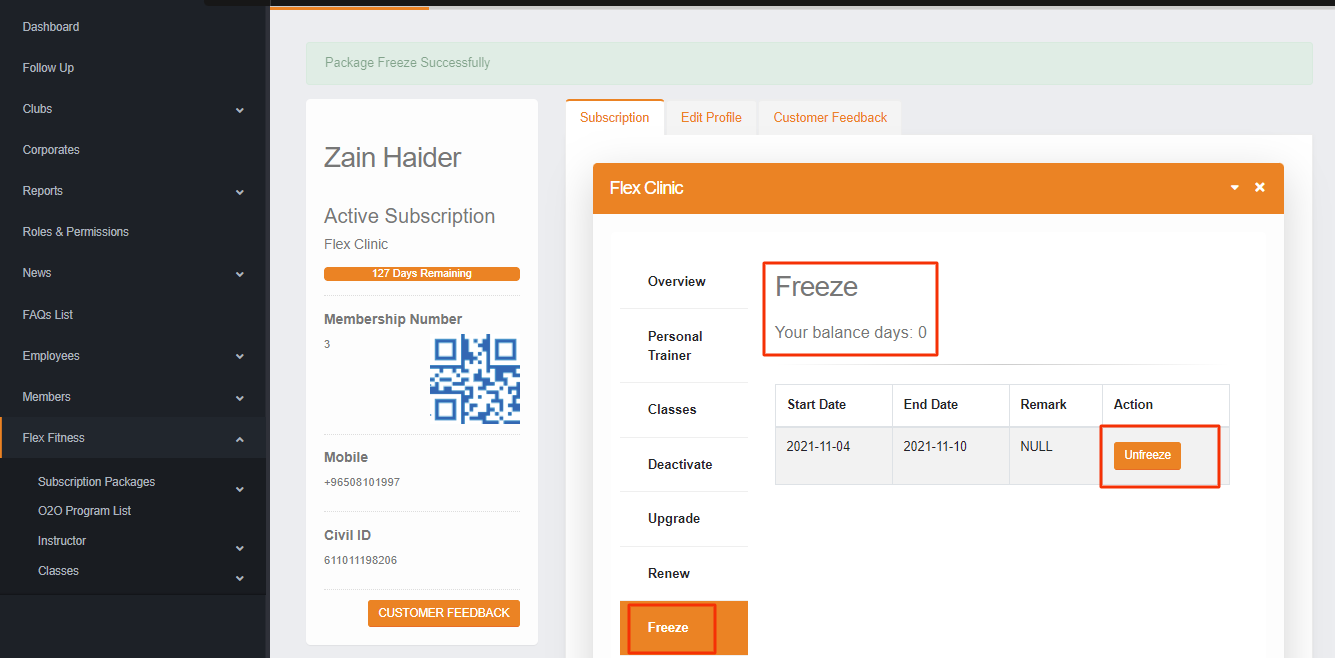](https://flex.doc.exodevs.com/uploads/images/gallery/2022-05/unfrezze.png)
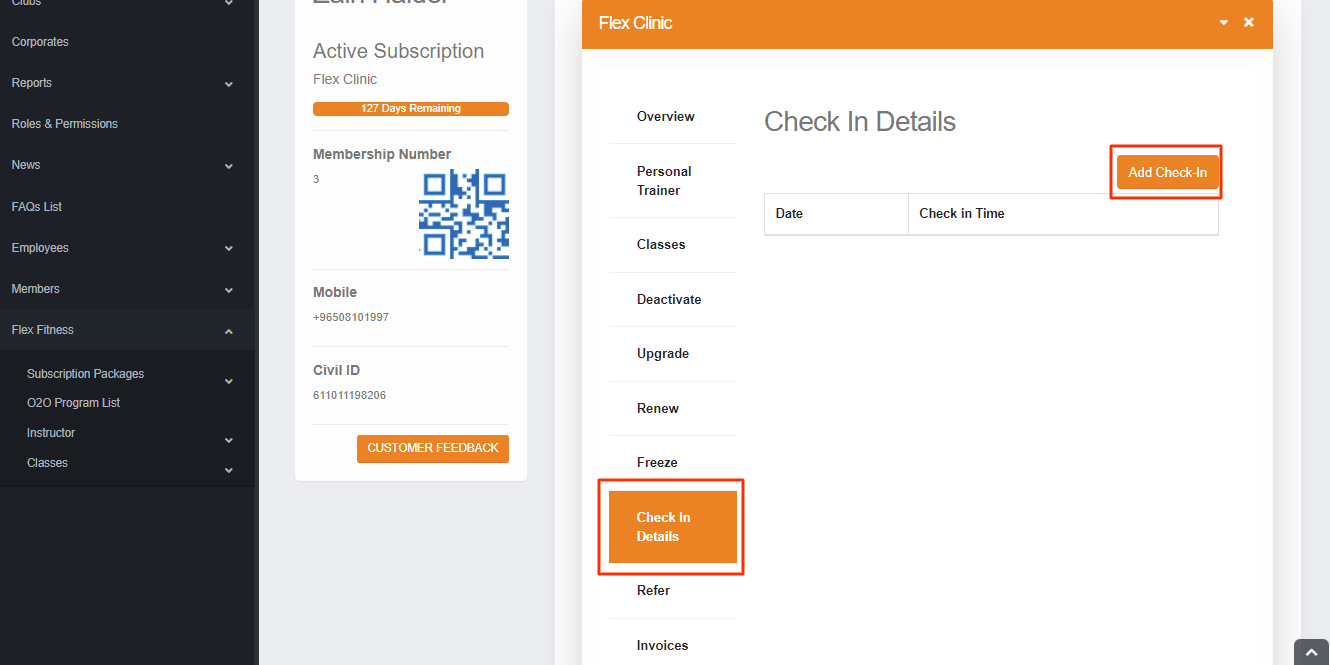
- **Check-in Details:** In this section, you can manually add the **check-in** against the member, the date & time automatically pick from the system to **check-in**. If user has a package in the que and yet it is not activated then on first check-in after the subscription the package will be activated.
[](https://flex.doc.exodevs.com/uploads/images/gallery/2022-05/check-in.png)
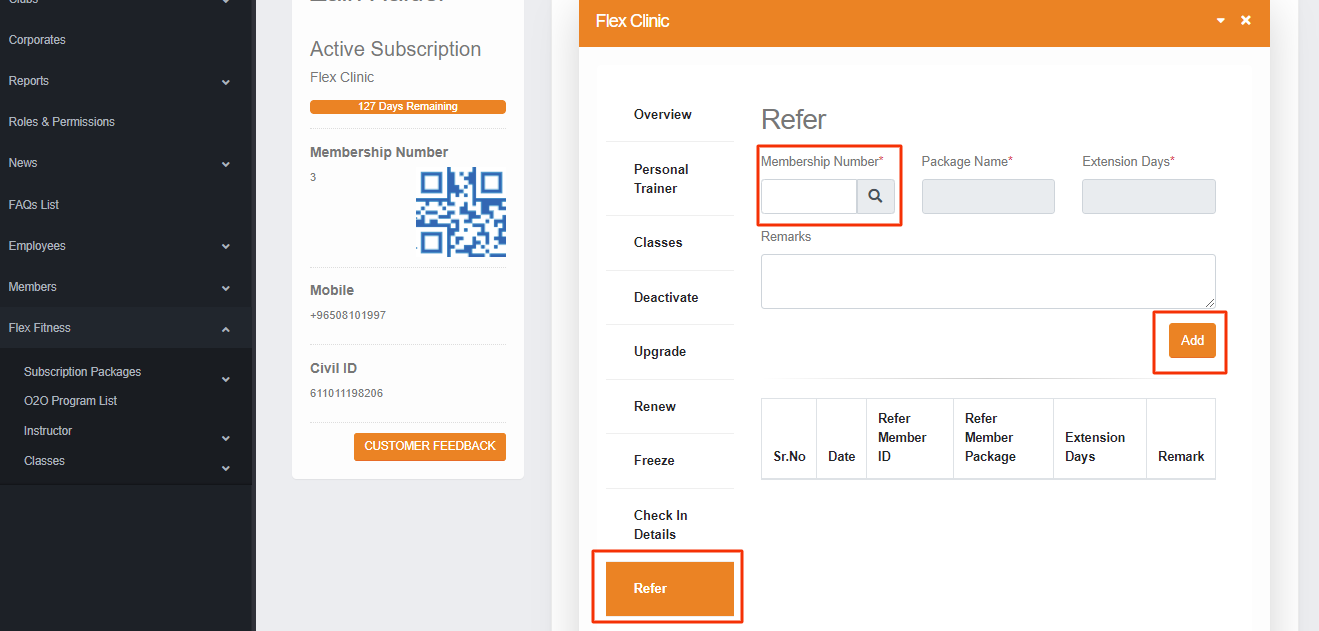
- **Refer**: In this section, when someone refer to the **new user** the **extension days** will be added in the member who **referred**, the same member can’t refer same user multiple time. So when you give the Membership Number and click on the search button if the member has an active package the given detail will automatically filled and the **extension days** be added to the package who referred.
[](https://flex.doc.exodevs.com/uploads/images/gallery/2022-05/refer.png)
# Member / Add new Member
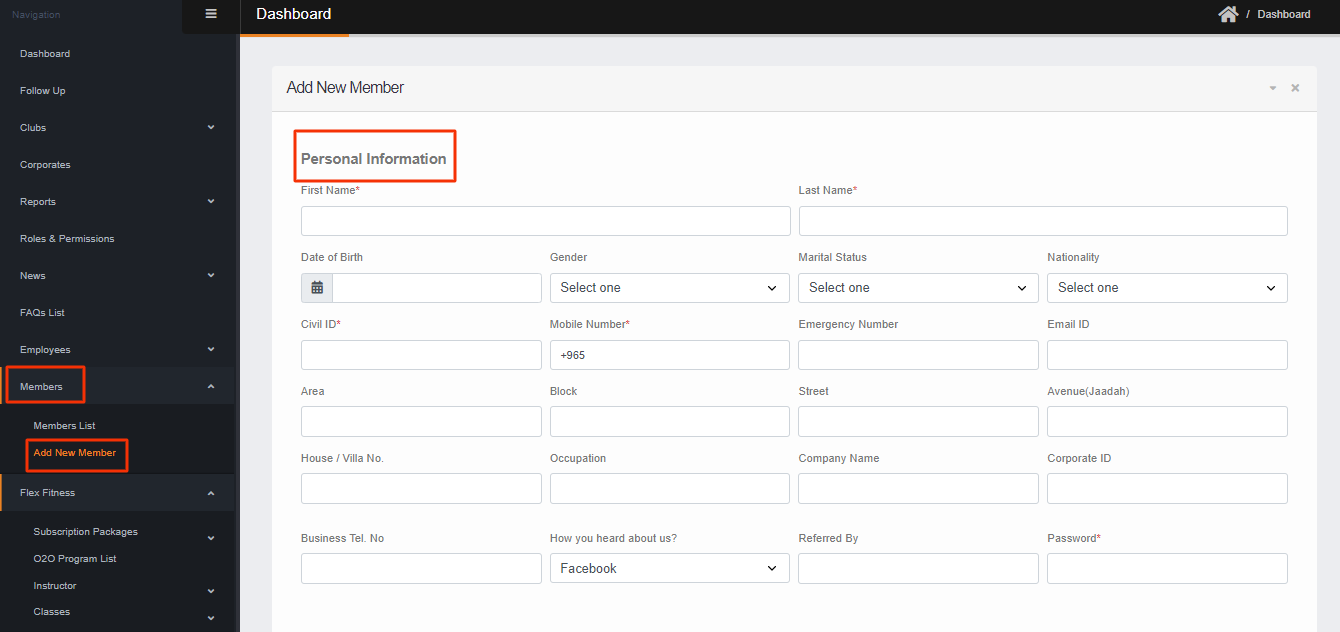
In this section, The new Member can be added. When the member will be added you can schedule the package as described by customer from member **more detail**. There will an option to select the desired club and package also customer can pay the whole package price from different payment mode i.e. **multiline payment mode**. The customer must have pay the whole amount to activate the package. The following are the mandatory fields to register the user.
1. First & Last Name
2. Civil ID
3. Mobile Number
4. Password
5. Sales Closed by
[](https://flex.doc.exodevs.com/uploads/images/gallery/2022-05/add-member.png)
# Flex Fitness / Subscription Package List
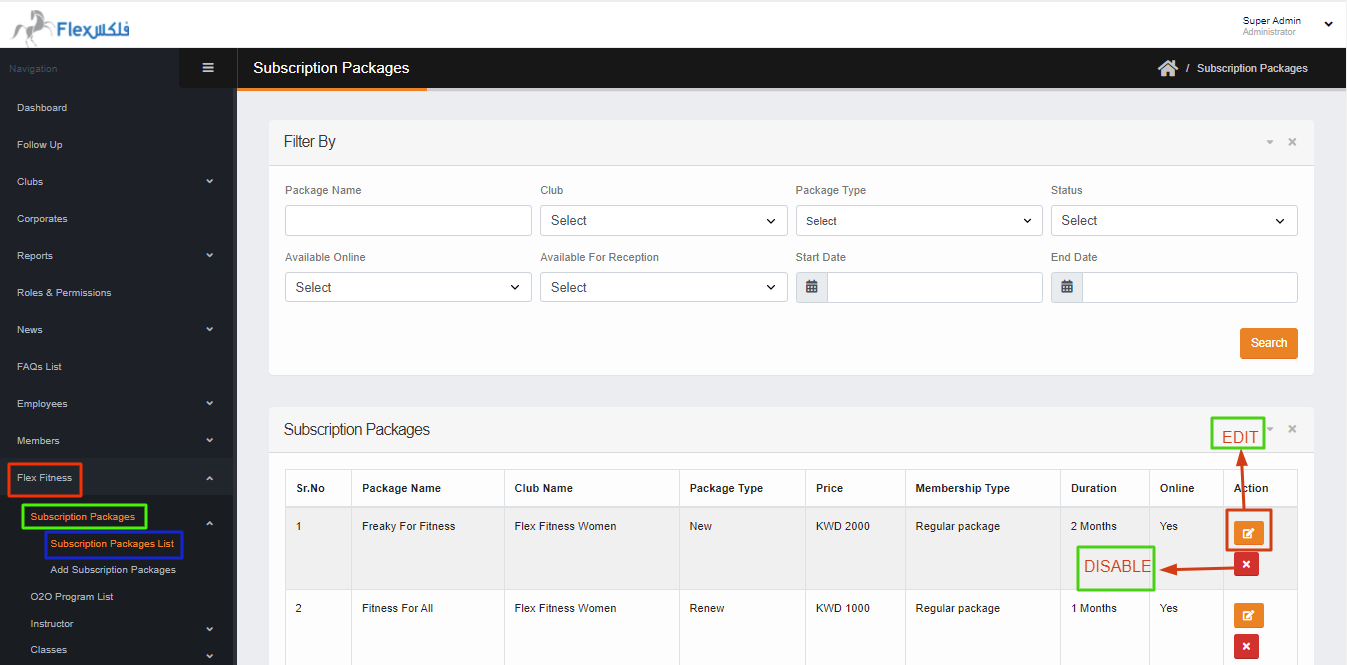
In this section, You can search the Package by **PACKAGE NAME**, **CLUB, PACKAGE TYPE, STATUS, AVAILABLE ONLINE, AVAILABLE FOR RECEPTION, START & END DATE.** Also, the Package can be edit & disable. When you disable the package you can activate the package & if the package existing package will Edit it will not effect to those member who already subscribed this package. This update will effect to new subscription.
[](https://flex.doc.exodevs.com/uploads/images/gallery/2022-05/subscription-package-list.png)
# Flex Fitness / Add new Subscription Package
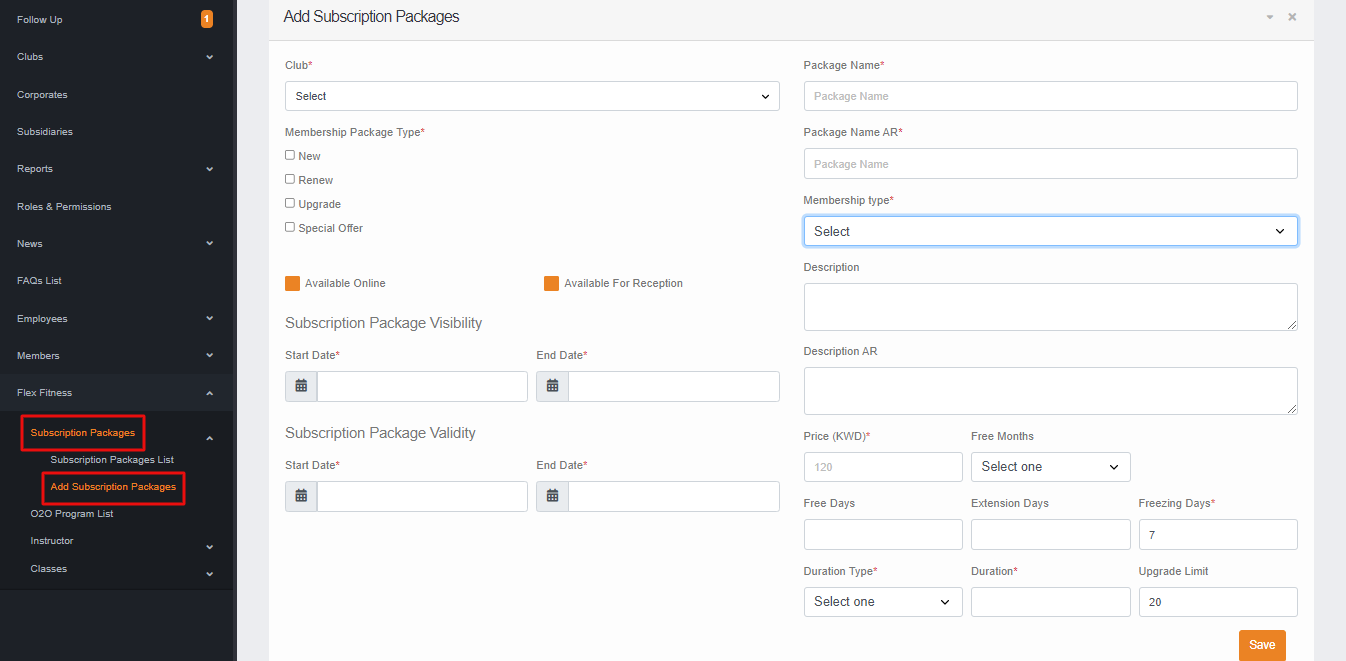
In this section, You can add the Package against the club. To Add the Package You have to fill the following fields
1. Select Club
2. Membership Package Type (Select “**NEW, RENEW, UPGRADE & SPECIAL OFFER”** package at once or separately).
3. Package Name in **ENG & AR**
4. Select the **Membership Type**.
5. Price
6. Freezing Days
7. Duration type
8. Duration
9. Start & End date for Available Online and offline.
After given the above mentioned fields you have to click on **Save** button to Add the package.
[](https://flex.doc.exodevs.com/uploads/images/gallery/2022-05/add-package.png)
# O2O Program list
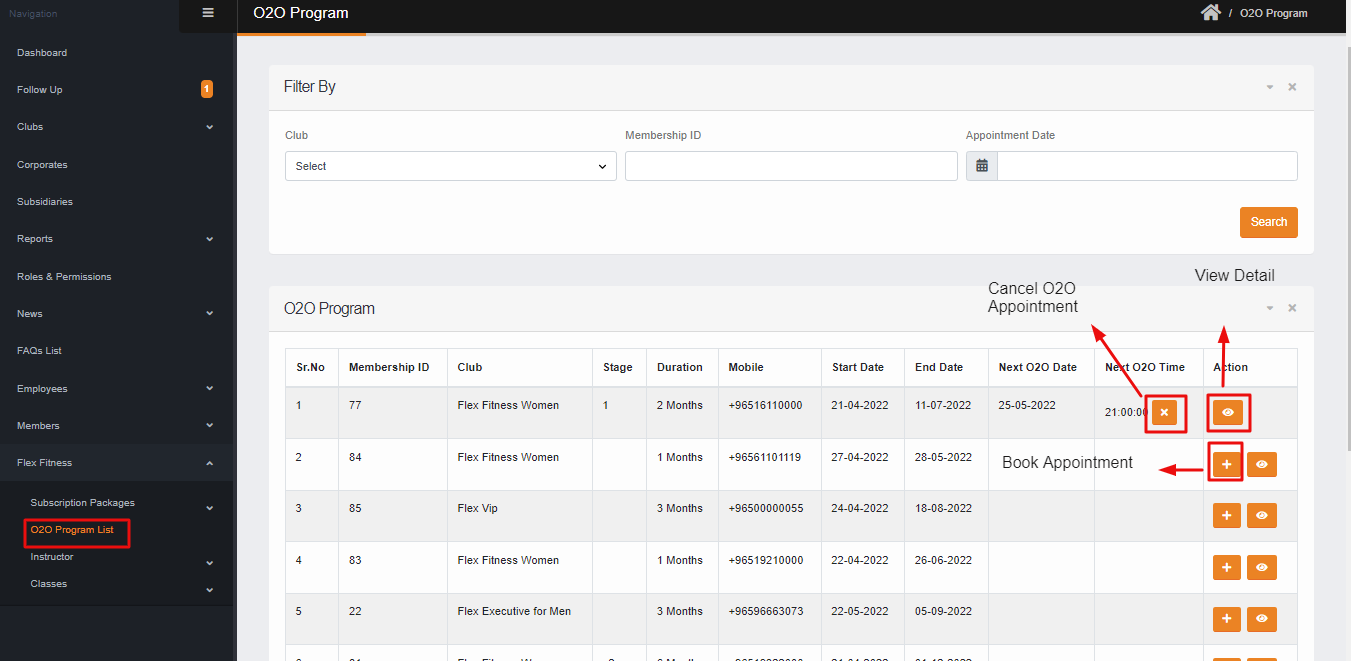
In this section, you can search the O2O Program by **Club, membership ID, and by Appointment date**. Also, you can Book the O2O Appointment & Add a **physical benchmark**. To book the appointment on the right side there is a plus button option where you can select the **Date, Time & Stage** that are mandatory fields also you can cancel the **appointment**.
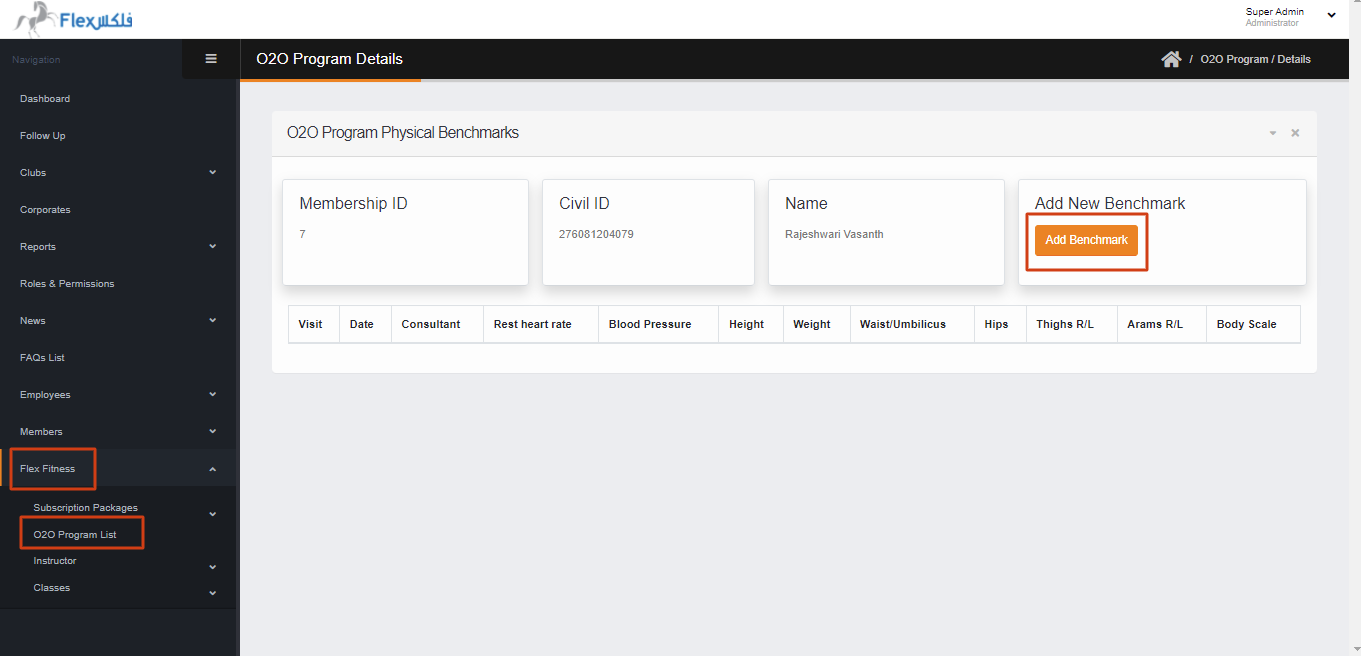
When you click on **View detail** you can see the benchmark detail if user avail already otherwise it will be empty.
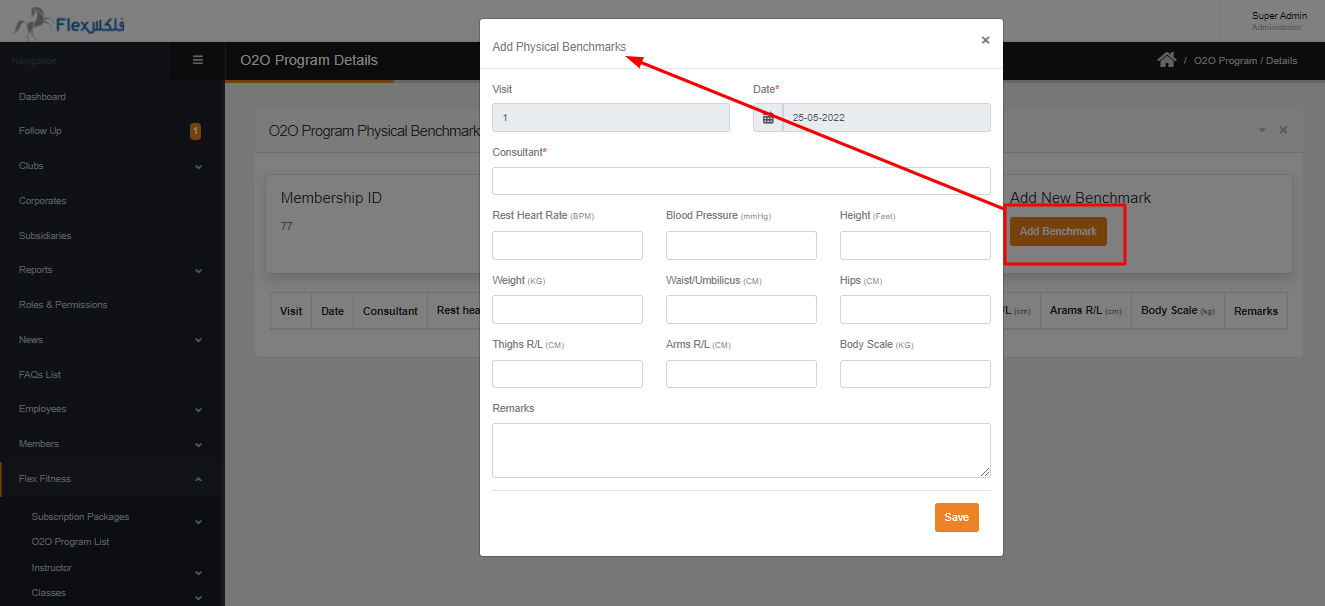
To Add the **Physical benchmark** you can click on **Add benchmark** and give the details along with remarks.
[](https://flex.doc.exodevs.com/uploads/images/gallery/2022-05/o2o-program.png)
[](https://flex.doc.exodevs.com/uploads/images/gallery/2022-05/benchmark-detail.png)
[](https://flex.doc.exodevs.com/uploads/images/gallery/2022-05/physical-benchmark.png)
# Instructor / Instructor List
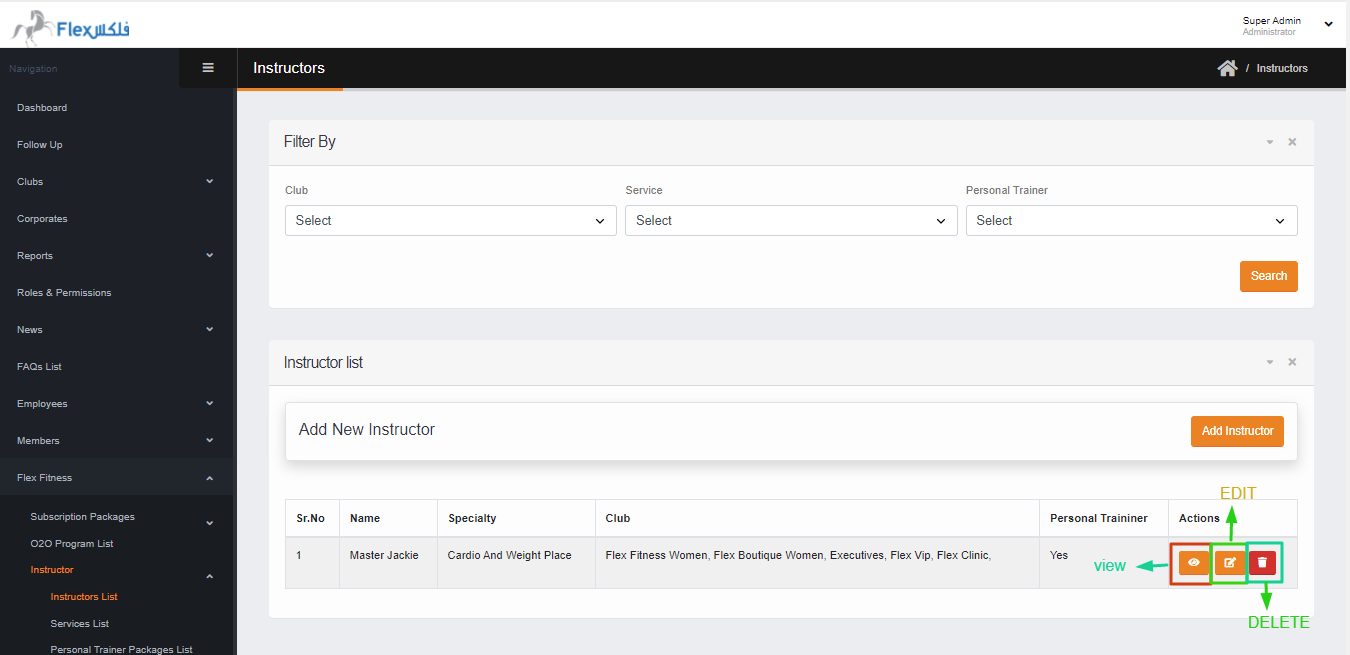
In this section, you can Search the instructor by **Club, Service & Personal Trainer** individually or with all fields. Also, you can Add a New Instructor by clicking on **ADD INSTRUCTOR**. The **instructor** detail can be viewed, Edit & delete.
[](https://flex.doc.exodevs.com/uploads/images/gallery/2022-05/instructor-list.png)
# Instructor / Service List
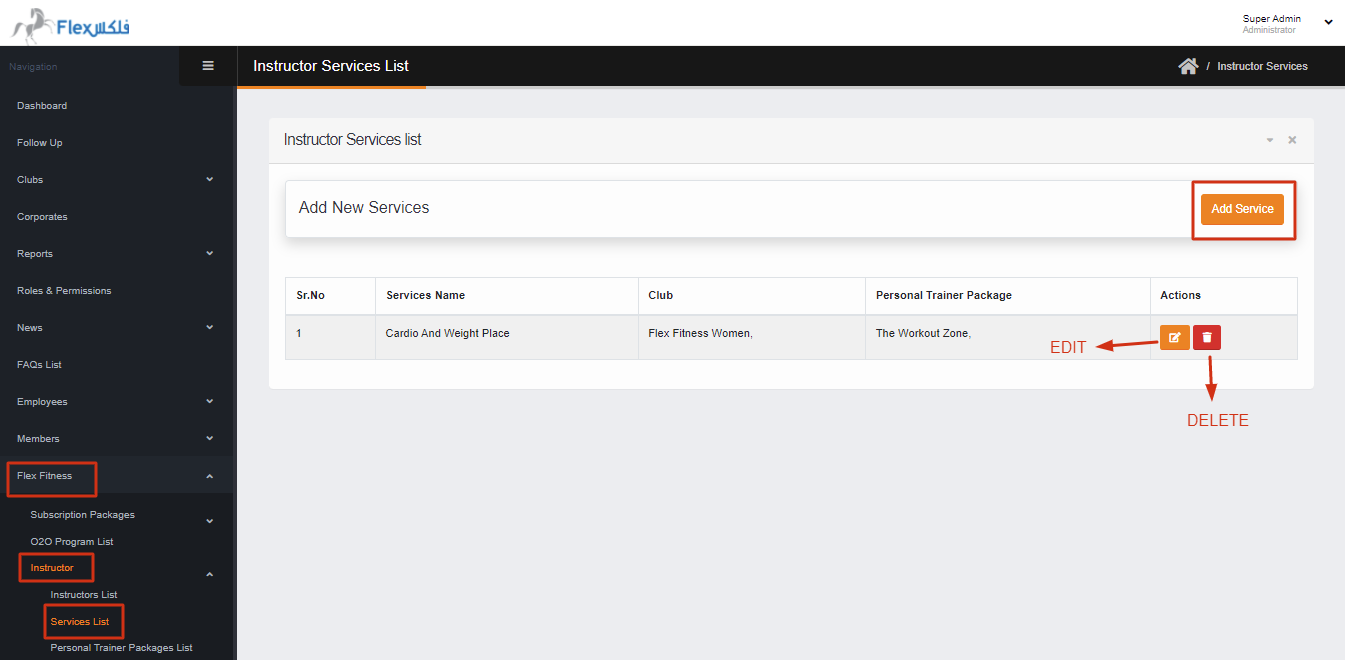
In this section, you can add a new Service by clicking on **ADD SERVICE** button. Also, you can **Edit** & **Delete** Service by clicking on the Edit & delete action button respectively.
[](https://flex.doc.exodevs.com/uploads/images/gallery/2022-05/add-service.png)
# Instructor / Personal Trainer Package List
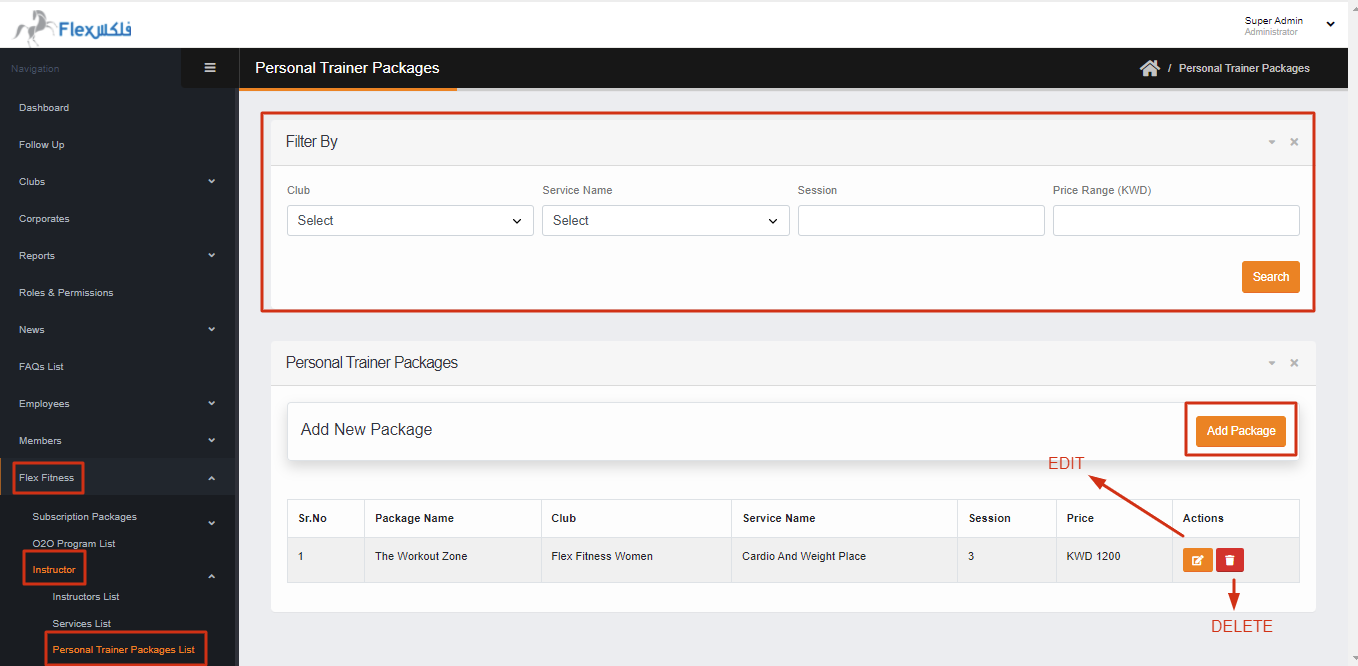
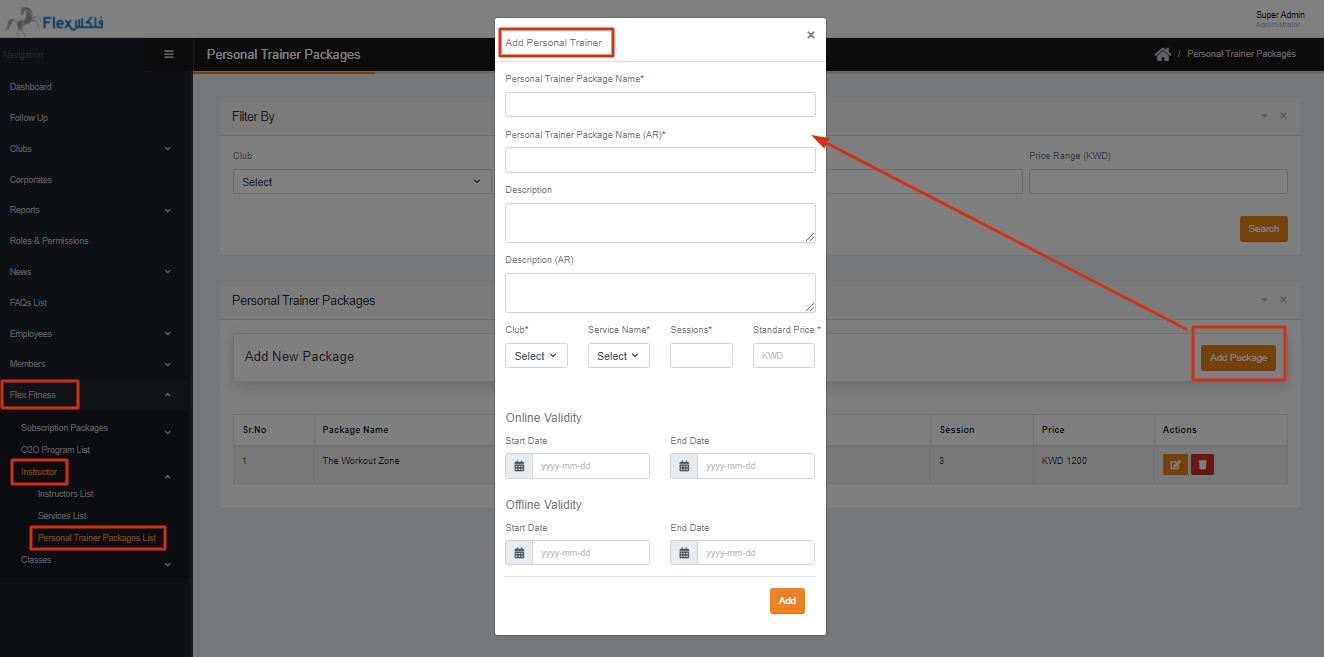
In this section, you can Search the Personal Trainer Package by all given fields or individually. Also, you can add a **New PT package**, **Delete** and **Edit** the existing package.
[](https://flex.doc.exodevs.com/uploads/images/gallery/2022-05/OsXpt-package-list.png)
[](https://flex.doc.exodevs.com/uploads/images/gallery/2022-05/add-pt-package.png)
# Classes / Add Classes Category
In this section, you can add the class category, also can Edit the class category.
[](https://flex.doc.exodevs.com/uploads/images/gallery/2022-05/class-category.png)[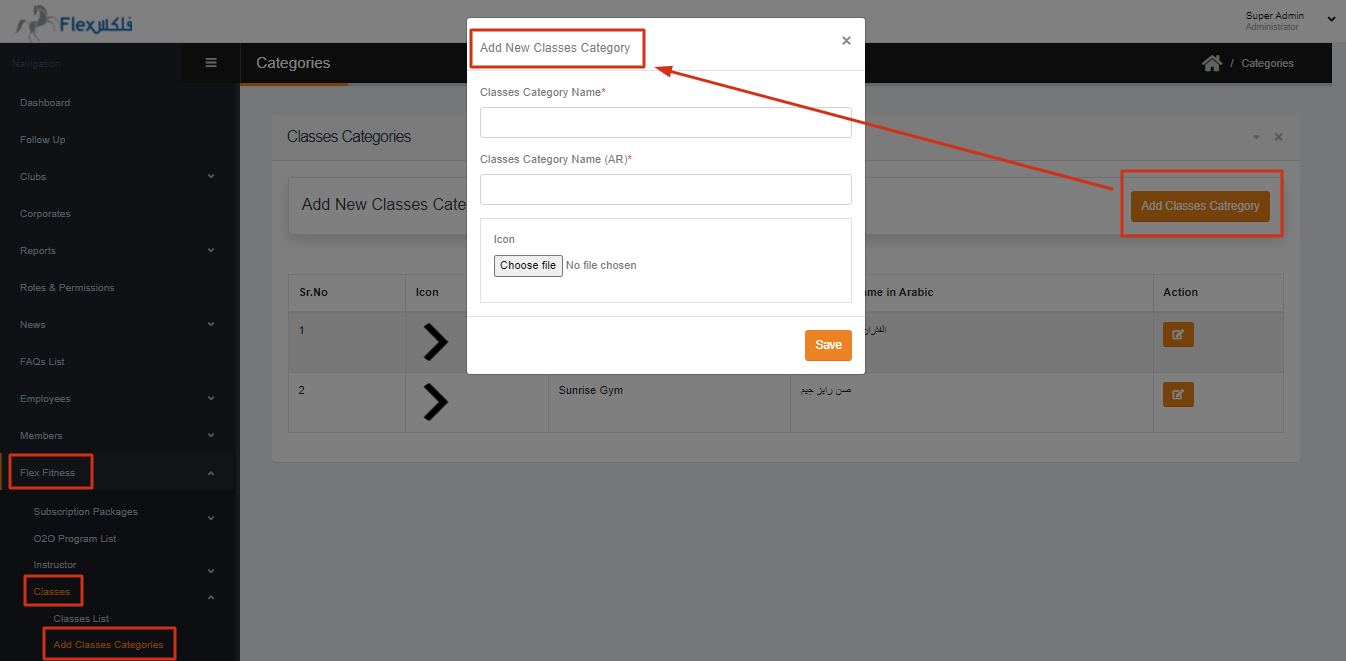](https://flex.doc.exodevs.com/uploads/images/gallery/2022-05/add-class-category.png)
# Classes / Classes List
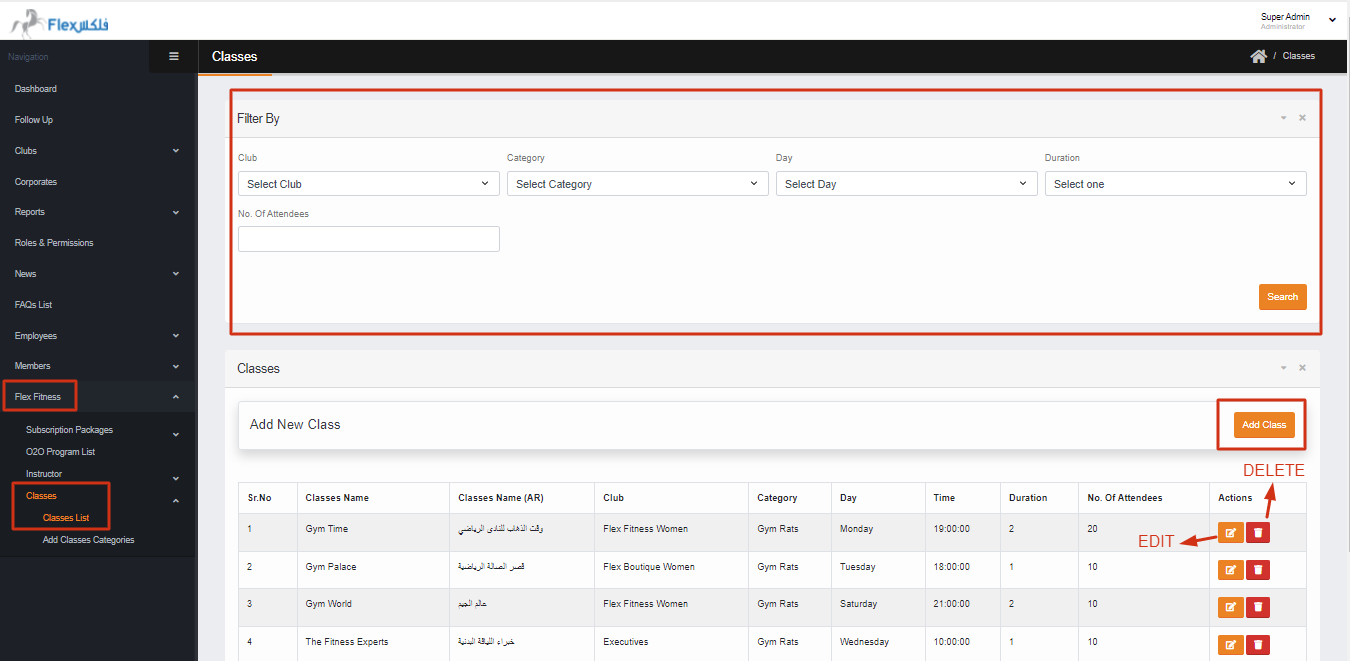
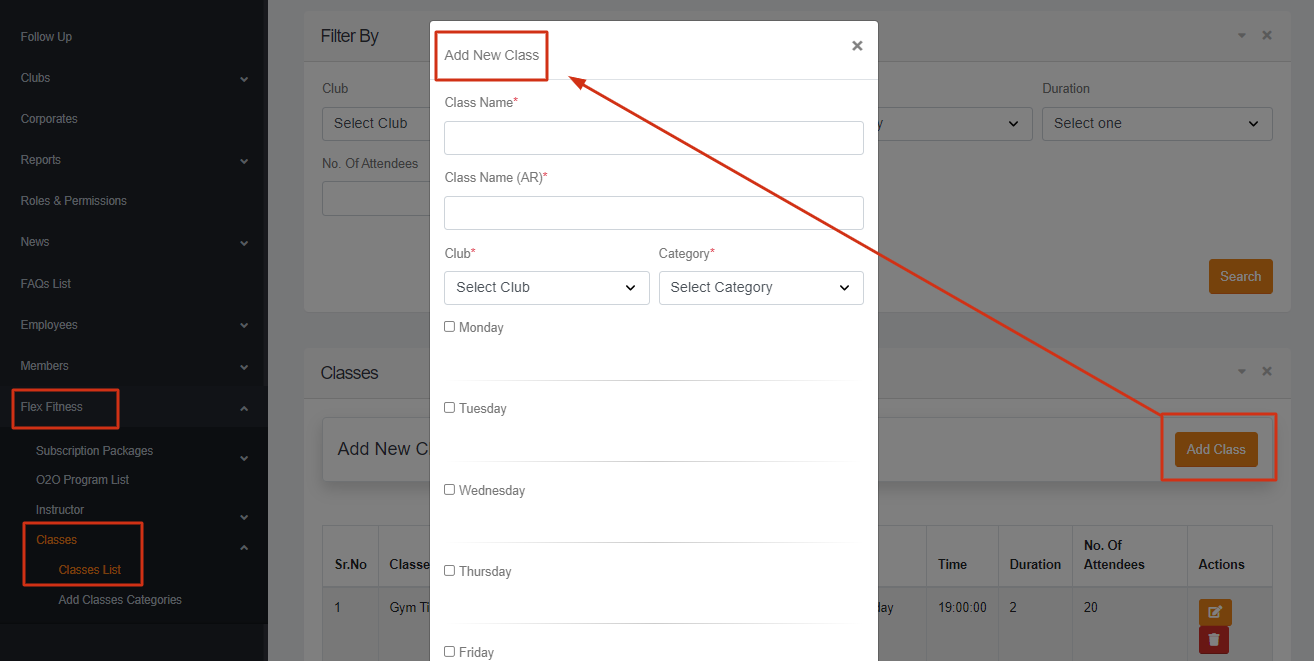
In this section, you can search the Classes by **Club,** **Category**, **Day, Duration & No of Attendees.** Also, you can **Add the Class** by clicking on the **ADD CLASS** button. Here you can **Edit** & **Delete** the class.
[](https://flex.doc.exodevs.com/uploads/images/gallery/2022-05/class-list.png)
[](https://flex.doc.exodevs.com/uploads/images/gallery/2022-05/add-class.png)
# Roles & Permissions
Roles & Permission
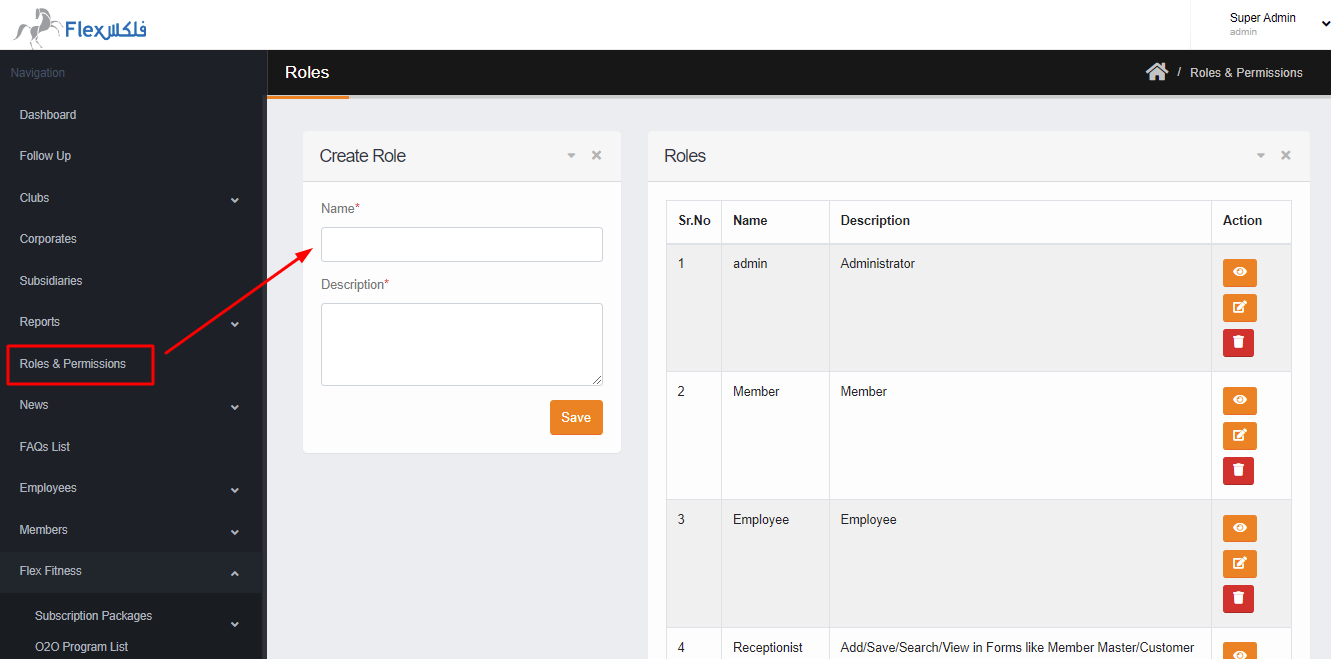
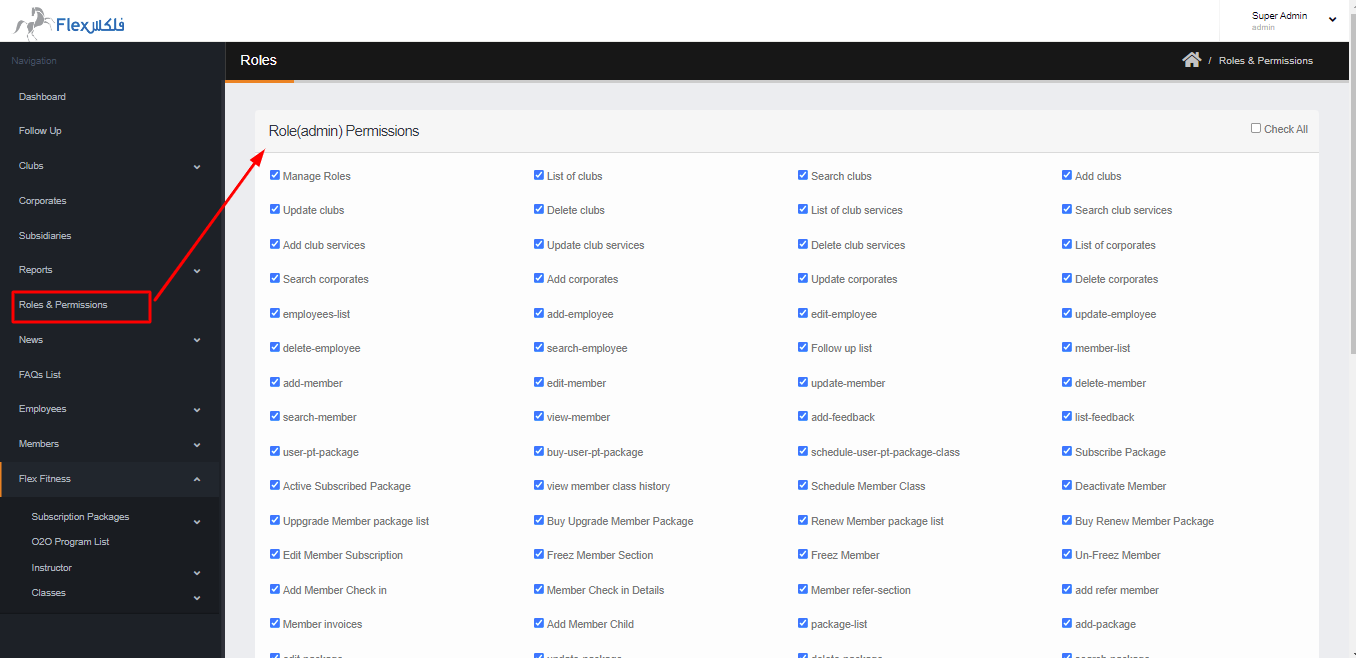
In this section you can create Roles and assigned the permissions, also you can view, delete & edit the permissions.
The assigned permission is effected on employee only, when you create new the new roles and assigned the permissions it will only shows to those employees which have these ASSIGNED ROLES.
[](https://flex.doc.exodevs.com/uploads/images/gallery/2022-06/image-1656599362640.png)
To assigned the permissions against the Roles, You have to click on view permissions and assigned the desired permissions. so the employee can access them from employee dashboard.
[](https://flex.doc.exodevs.com/uploads/images/gallery/2022-06/image-1656599373485.png)